本来也懒得写,但是网上开源的编辑器总是太大,太累赘,而我只需要一个简简单单可以发点小心情的编辑器,所以就想到了自己设计一个,原理也很简单,现在把代码贴出来:
var editorUtils = function () {
    $context = null;
    return {
        /**
         * 初始化编辑器
         * @param $obj
         */
        init:function ($obj) {
            $context = document.createElement("div");
            $context.contentEditable = true;
            $context.className = $obj.className;
            $obj.style.display = "none";
            $obj.parentNode.insertBefore($context,$obj.nextSibling);
        },
        /**
         * 插入元素
         * @param obj 通常是一个node节点
         */
        insert:function (obj) {
            $context.appendChild(obj);
        },
        /**
         * 插入全部,一般用于编辑器初始化使用
         * @param obj 通常是html代码
         */
        insertAll:function (obj) {
            $context.innerHTML = obj;
        },
        /**
         * 取html代码内容
         * @returns {*}
         */
        getContextForHtml:function () {
            return $context.innerHTML;
        },
        /**
         * 取文本内容
         * @returns {UE.uNode.innerText|UM.uNode.innerText|string|*}
         */
        getContextForTxt:function () {
            return $context.innerText;
        }
    }
}(window)
上面的代码,就是编辑器的代码,把对象直接绑定到window对象中,方便调用;
接下来,就是实现了,首先我们需要一个DOM对象来绑定编辑器:
<div class="contentEditable"></div>
自己新建了一个div,这里最好使用ID,本人是测试,所以懒;
然后调用编辑器对象的init方法,初始化编辑器;
editorUtils.init(document.getElementsByClassName("contentEditable")[0]);
init的方法,主要是设置编辑器的高度宽度,已经class样式,继承绑定对象的属性,我只写了一个class绑定,之后就把绑定对象隐藏起来;
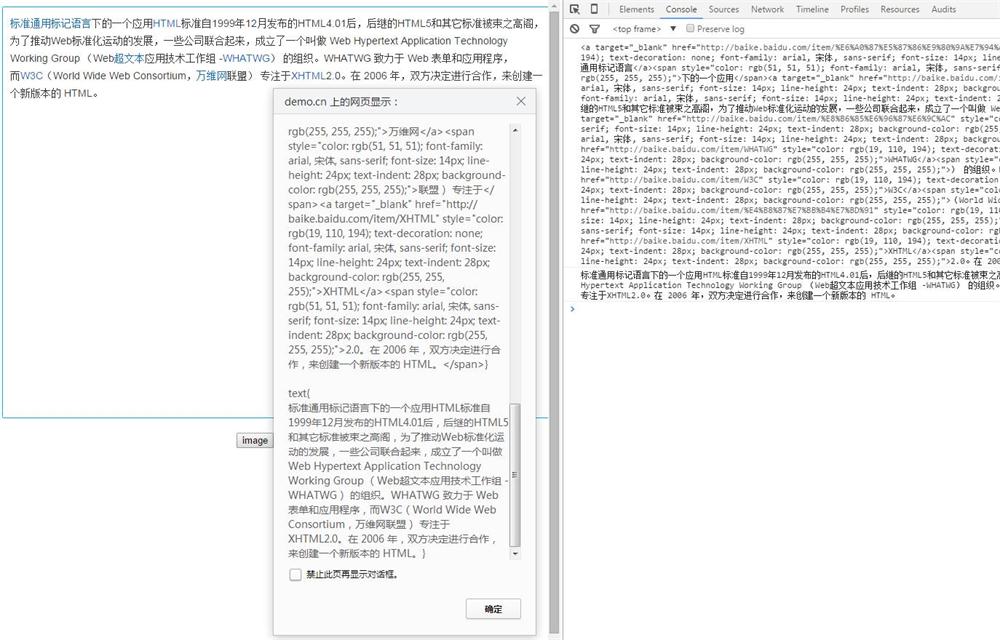
然后大功告成了,现在可以编辑内容了,我们来看一下截图:
接着,就是需要两个按钮,一个是图片插入,也可以把它当成表情的按钮,另外一个是提交按钮;
var $image = document.getElementById("image");
var $submit = document.getElementById("submit");
$image.addEventListener("click",function () {
    var p = document.createElement("p");
    //p.style.textAlign = "center";
    p.innerHTML = "<img src='/res/images/logo2.png'/>"
    editorUtils.insert(p)
})

$submit.addEventListener("click",function () {
    var html = editorUtils.getContextForHtml();
    var text = editorUtils.getContextForTxt();
    console.log(html);
    console.log(text);
    alert("html{\n"+html+"}\n\ntext{\n"+text+"}");
})
代码贴出来了,editorUtils.insert就是为了专门插入node元素而设定的,你可以插入任何node对象;
反而insertAll的方法是为了初始化编辑器内容而设定的;
取内容跟取html的方法分别是:
editorUtils.getContextForTxt()
editorUtils.getContextForHtml()
一个是返回纯文本,不含html代码的内容,另外一个是返回html代码的内容。
介绍就到这里了。下面是全部代码,自己复制粘贴测试一下吧。
<!DOCTYPE html>
<html>
<head lang="en">
    <meta charset="UTF-8">
    <title>test</title>
</head>
<body>
    <div class="contentEditable"></div>
    <div style="text-align: center;margin-top: 20px;">
        <button type="button" id="image">image</button>
        <button type="button" id="submit">submit</button>
    </div>
</body>
</html>

<style>
    html,body{
        height: 100%;
        width: 100%;
    }
    .contentEditable{
        height: 60%;
        border: 1px solid #03AEFF;
        border-radius: 2px;
        padding: 10px;
        margin-top: 10px;
        overflow: hidden;
        overflow-y: auto;
    }

</style>

<script type="application/x-javascript">
var editorUtils = function () {
    $context = null;
    return {
        /**
         * 初始化编辑器
         * @param $obj
         */
        init:function ($obj) {
            $context = document.createElement("div");
            $context.contentEditable = true;
            $context.className = $obj.className;
            $obj.style.display = "none";
            $obj.parentNode.insertBefore($context,$obj.nextSibling);
        },
        /**
         * 插入元素
         * @param obj 通常是一个node节点
         */
        insert:function (obj) {
            $context.appendChild(obj);
        },
        /**
         * 插入全部,一般用于编辑器初始化使用
         * @param obj 通常是html代码
         */
        insertAll:function (obj) {
            $context.innerHTML = obj;
        },
        /**
         * 取html代码内容
         * @returns {*}
         */
        getContextForHtml:function () {
            return $context.innerHTML;
        },
        /**
         * 取文本内容
         * @returns {UE.uNode.innerText|UM.uNode.innerText|string|*}
         */
        getContextForTxt:function () {
            return $context.innerText;
        }
    }
}(window)


editorUtils.init(document.getElementsByClassName("contentEditable")[0]);

var $image = document.getElementById("image");
var $submit = document.getElementById("submit");
$image.addEventListener("click",function () {
    var p = document.createElement("p");
    //p.style.textAlign = "center";
    p.innerHTML = "<img src='/res/images/logo2.png'/>"
    editorUtils.insert(p)
})

$submit.addEventListener("click",function () {
    var html = editorUtils.getContextForHtml();
    var text = editorUtils.getContextForTxt();
    console.log(html);
    console.log(text);
    alert("html{\n"+html+"}\n\ntext{\n"+text+"}");
})
</script>
