使用 Google Maps Android API v2
使用谷歌提供的SDK,Android Studio开发。
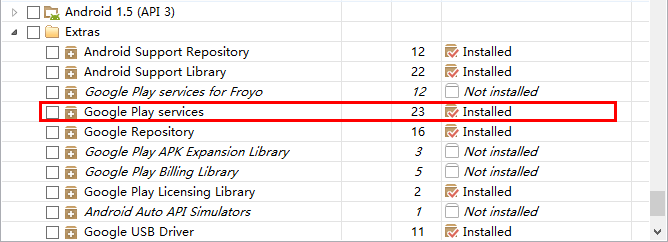
2.新建一个工程GoogleMapDemo,然后File ->Project Structure->[app]->->Dependences,点击加号,添加play service依赖。

3.要使用谷歌提低,需要到Google Developers Console申请一个Key。
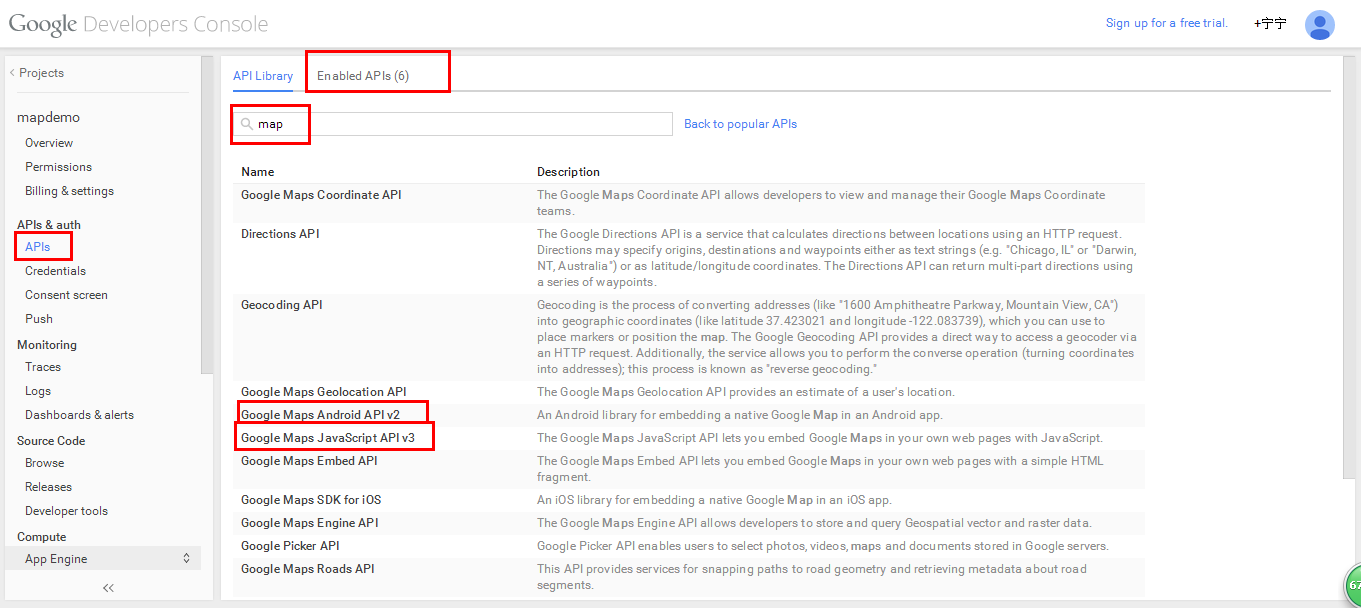
首先创建一个工程,然后在API标签选择启用Google Maps Android API v2,也可以顺带多选几个比如JS的备用。

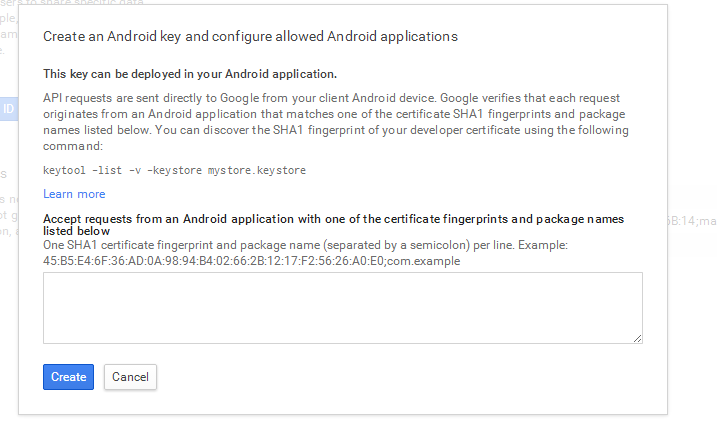
在 Credentials 标签 Public API access 处添加一个Android key.

使用用于签名的keystore生成一个SHA-1指纹,可以先使用debug.kestore。我的在C:\Users\RANDY.android\下。
keytool -list -v -keystore debug.keystore
密码:android
将生成的指纹填在指定输入框,create OK。同时会生成一个API KEY。
4.配置工程的Manifest文件:
<?xml version="1.0" encoding="utf-8"?>
<manifest xmlns:android="http://schemas.android.com/apk/res/android"
    package="map.randy.com.googlemapdemo" >
    <uses-permission android:name="android.permission.INTERNET"/>
    <uses-permission android:name="android.permission.ACCESS_NETWORK_STATE"/>
    <uses-permission android:name="android.permission.WRITE_EXTERNAL_STORAGE"/>
    <!-- The following two permissions are not required to use
         Google Maps Android API v2, but are recommended. -->
    <uses-permission android:name="android.permission.ACCESS_COARSE_LOCATION"/>
    <uses-permission android:name="android.permission.ACCESS_FINE_LOCATION"/>
    <uses-feature
        android:glEsVersion="0x00020000"
        android:required="true"/>
    <application
        android:allowBackup="true"
        android:icon="@mipmap/ic_launcher"
        android:label="@string/app_name"
        android:theme="@style/AppTheme" >
        <activity
            android:name=".MainActivity"
            android:label="@string/app_name" >
            <intent-filter>
                <action android:name="android.intent.action.MAIN" />
                <category android:name="android.intent.category.LAUNCHER" />
            </intent-filter>
        </activity>
        <meta-data
            android:name="com.google.android.gms.version"
            android:value="@integer/google_play_services_version" />
        <meta-data
            android:name="com.google.android.maps.v2.API_KEY"
            android:value="*API_KEY*"/>
    </application>
</manifest>
5.配置Activity,使用Fragment来显示地图。
布局:
<RelativeLayout xmlns:android="http://schemas.android.com/apk/res/android"
    xmlns:tools="http://schemas.android.com/tools"
    android:layout_width="match_parent"
    android:layout_height="match_parent"
    tools:context=".MainActivity">
    <TextView
        android:text="@string/hello_world"
        android:layout_width="wrap_content"
        android:layout_height="wrap_content" />
    <fragment
        android:id="@+id/map"
        android:layout_width="match_parent"
        android:layout_height="match_parent"
        android:name="com.google.android.gms.maps.MapFragment"/>
</RelativeLayout>
MainActivity
package map.randy.com.googlemapdemo;

import android.os.Bundle;
import android.support.v4.app.FragmentActivity;

import com.google.android.gms.maps.CameraUpdateFactory;
import com.google.android.gms.maps.GoogleMap;
import com.google.android.gms.maps.MapFragment;
import com.google.android.gms.maps.OnMapReadyCallback;
import com.google.android.gms.maps.model.LatLng;
import com.google.android.gms.maps.model.MarkerOptions;


public class MainActivity extends FragmentActivity implements OnMapReadyCallback {

    @Override
    protected void onCreate(Bundle savedInstanceState) {
        super.onCreate(savedInstanceState);
        setContentView(R.layout.activity_main);

        MapFragment mapFragment = (MapFragment) getFragmentManager()
                .findFragmentById(R.id.map);
        mapFragment.getMapAsync(this);
    }

    @Override
    public void onMapReady(GoogleMap googleMap) {
        LatLng sydney = new LatLng(-33.867, 151.206);

        googleMap.setMyLocationEnabled(true);
        googleMap.moveCamera(CameraUpdateFactory.newLatLngZoom(sydney, 13));

        googleMap.addMarker(new MarkerOptions()
                .title("Sydney")
                .snippet("The most populous city in Australia.")
                .position(sydney));
    }
}
但是这是在翻墙情况下,,如果没有翻墙,只能是空白。。。
而谷歌在V2提供了一个遮罩层,开发者可以使用它来自定义地图。
package map.randy.com.googlemapdemo;
import android.os.Bundle;
import android.support.v4.app.FragmentActivity;

import com.google.android.gms.maps.CameraUpdateFactory;
import com.google.android.gms.maps.GoogleMap;
import com.google.android.gms.maps.MapFragment;
import com.google.android.gms.maps.OnMapReadyCallback;
import com.google.android.gms.maps.model.LatLng;
import com.google.android.gms.maps.model.MarkerOptions;
import com.google.android.gms.maps.model.TileOverlayOptions;
import com.google.android.gms.maps.model.TileProvider;
import com.google.android.gms.maps.model.UrlTileProvider;

import java.net.MalformedURLException;
import java.net.URL;
import java.util.Random;


public class MainActivity extends FragmentActivity implements OnMapReadyCallback {

    @Override
    protected void onCreate(Bundle savedInstanceState) {
        super.onCreate(savedInstanceState);
        setContentView(R.layout.activity_main);

        MapFragment mapFragment = (MapFragment) getFragmentManager()
                .findFragmentById(R.id.map);
        TileProvider tileProvider = new UrlTileProvider(512, 512) {

            @Override
            public URL getTileUrl(int x, int y, int zoom) {
                 /* Define the URL pattern for the tile images */
                Random random = new Random();
                String s = String.format("http://mt"+random.nextInt(3)+".google.cn/vt/lyrs=m@142&hl=zh-CN&gl=cn&x=%d&y=%d&z=%d&s=Galil",
                        x, y,zoom);
                if (!checkTileExists(x, y, zoom)) {
                    return null;
                }

                try {
                    return new URL(s);
                } catch (MalformedURLException e) {
                    throw new AssertionError(e);
                }
            }
        };
        TileOverlayOptions tpo = new TileOverlayOptions();
        tpo.tileProvider(tileProvider);
        mapFragment.getMap().addTileOverlay(tpo);
        mapFragment.getMap().setMapType(GoogleMap.MAP_TYPE_NONE);
        mapFragment.getMapAsync(this);
    }

    private boolean checkTileExists(int x, int y, int zoom) {
        int minZoom = 12;
        int maxZoom = 16;

        if ((zoom < minZoom || zoom > maxZoom)) {
            return false;
        }

        return true;
    }

    @Override
    public void onMapReady(GoogleMap googleMap) {
        LatLng sydney = new LatLng(-33.867, 151.206);

        googleMap.setMyLocationEnabled(true);
        googleMap.moveCamera(CameraUpdateFactory.newLatLngZoom(sydney, 13));

        googleMap.addMarker(new MarkerOptions()
                .title("Sydney")
                .snippet("The most populous city in Australia.")
                .position(sydney));
    }
}


