生产服 redis 重启步骤

Redis 重启流程

步骤 操作
第一步 进入 Redis 安装目录
第二步 停止 Redis 服务
第三步 修改 Redis 配置文件
第四步 启动 Redis 服务
第五步 验证 Redis 是否重启成功

第一步:进入 Redis 安装目录

在命令行中输入以下命令,进入 Redis 安装目录:cd /usr/local/redis/redis-5.0.2

第二步:停止 Redis 服务

使用以下命令停止 Redis 服务:./redis-cli shutdown

这条命令会向 Redis 发送关闭信号,使其优雅地停止服务。

第三步:修改 Redis 配置文件

找到 Redis 配置文件 redis.conf,并使用文本编辑器打开它。可以使用以下命令打开配置文件:

vim redis.conf

其实应该把想要修改的参数,先修改了,比如我今天要改的是:

tcp-backlog 511 -> tcp-backlog 1024

在配置文件中,你可以修改各种 Redis 的配置项。例如,你可以修改端口号、密码、持久化等设置。根据你的需求修改相应的配置。

第四步:启动 Redis 服务

使用以下命令启动 Redis 服务:./redis-server ../redis.conf

这条命令会启动 Redis 服务,并使用指定的配置文件。

第五步:验证 Redis 是否重启成功

运行以下命令检查 Redis 服务是否已经启动并运行:redis-cli ping

如果返回 PONG,则表示 Redis 服务已经成功启动。

redis 设置 tcp-backlog

什么是 Redis backlog

TCP backlog 参数是在使用 Redis 客户端连接到 Redis 服务器时,操作系统用于缓存的连接请求的数量。如果连接请求超出了 backlog 参数设置的值,那么新的连接请求可能会超时,这就是您所遇到的问题。

官方描述:

# TCP listen() backlog. # # In high requests-per-second environments you need an high backlog in order # to avoid slow clients connections issues. Note that the Linux kernel # will silently truncate it to the value of /proc/sys/net/core/somaxconn so # make sure to raise both the value of somaxconn and tcp_max_syn_backlog # in order to get the desired effect. tcp-backlog 511
需要根据这2个参数进行调节:
/proc/sys/net/core/somaxconn 
/proc/sys/net/ipv4/tcp_max_syn_backlog

如何增加 Redis backlog

实际上,Redis 默认的 backlog 大小已经足够应对绝大部分的情况。但是在特殊情况下,如果我们需要处理大量的并发请求或者网络延迟较大,我们可以通过修改配置文件来增加 Redis 的 backlog。

步骤一:打开 Redis 配置文件

在命令行中输入以下命令,打开 Redis 的配置文件:

vi ./redis/redis.conf

步骤二:修改 Redis 配置

找到 tcp-backlog 的配置项,默认情况下该项被注释掉了,我们需要将其取消注释,并设置一个合适的值。例如,我们将 backlog 设置为 511:

tcp-backlog 511

步骤三:重启 Redis 服务器

保存并关闭 Redis 配置文件后,我们需要重启 Redis 服务器,使配置生效。在命令行中输入以下命令:

sudo systemctl restart redis

代码示例

下面是一个使用 Redis 的简单示例,演示了如何增加 Redis backlog:

import redis

# 创建 Redis 连接池
pool = redis.ConnectionPool(host='localhost', port=6379, db=0, socket_connect_timeout=2, socket_timeout=2, socket_keepalive=True)

# 创建 Redis 客户端
redis_client = redis.Redis(connection_pool=pool)

# 增加 Redis backlog
redis_client.config_set('tcp-backlog', 511)

# 进行其他操作
.....

类图

下面是 Redis 客户端的类图:

微信截图_20240531144551

结论

通过增加 Redis backlog,我们可以提高系统的并发处理能力,避免请求丢失或超时。在实际应用中,我们可以根据系统的实际情况来调整 Redis 的 backlog 大小,以达到最佳的性能表现。希望本文对你理解和使用 Redis 有所帮助。


Redisson 分布式锁

从分布式锁到Redisson实现非常详细,适合慢慢咀嚼~

1. Redisson概述

什么是Redisson?

Redisson是一个在Redis的基础上实现的Java驻内存数据网格(In-Memory Data Grid)。它不仅提供了一系列的分布式的Java常用对象,还提供了许多分布式服务。

Redisson的宗旨是促进使用者对Redis的关注分离(Separation of Concern),从而让使用者能够将精力更集中地放在处理业务逻辑上。

一个基于Redis实现的分布式工具,有基本分布式对象和高级又抽象的分布式服务,为每个试图再造分布式轮子的程序员带来了大部分分布式问题的解决办法。

Redisson和Jedis、Lettuce有什么区别?倒也不是雷锋和雷锋塔

Redisson和它俩的区别就像一个用鼠标操作图形化界面,一个用命令行操作文件。Redisson是更高层的抽象,Jedis和Lettuce是Redis命令的封装。

  • Jedis是Redis官方推出的用于通过Java连接Redis客户端的一个工具包,提供了Redis的各种命令支持
  • Lettuce是一种可扩展的线程安全的 Redis 客户端,通讯框架基于Netty,支持高级的 Redis 特性,比如哨兵,集群,管道,自动重新连接和Redis数据模型。Spring Boot 2.x 开始 Lettuce 已取代 Jedis 成为首选 Redis 的客户端。
  • Redisson是架设在Redis基础上,通讯基于Netty的综合的、新型的中间件,企业级开发中使用Redis的最佳范本

Jedis把Redis命令封装好,Lettuce则进一步有了更丰富的Api,也支持集群等模式。但是两者也都点到为止,只给了你操作Redis数据库的脚手架,而Redisson则是基于Redis、Lua和Netty建立起了成熟的分布式解决方案,甚至redis官方都推荐的一种工具集。

2. 分布式锁

分布式锁怎么实现?

分布式锁是并发业务下的刚需,虽然实现五花八门:ZooKeeper有Znode顺序节点,数据库有表级锁和乐/悲观锁,Redis有setNx,但是殊途同归,最终还是要回到互斥上来,本篇介绍Redisson,那就以redis为例。

怎么写一个简单的Redis分布式锁?

以Spring Data Redis为例,用RedisTemplate来操作Redis(setIfAbsent已经是setNx + expire的合并命令),如下

// 加锁
public Boolean tryLock(String key, String value, long timeout, TimeUnit unit) {
    return redisTemplate.opsForValue().setIfAbsent(key, value, timeout, unit);
}
// 解锁,防止删错别人的锁,以uuid为value校验是否自己的锁
public void unlock(String lockName, String uuid) {
    if(uuid.equals(redisTemplate.opsForValue().get(lockName)){        redisTemplate.opsForValue().del(lockName);    }
}

// 结构
if(tryLock){
    // todo
}finally{
    unlock;
}

这是锁没错,但get和del操作非原子性,并发一旦大了,无法保证进程安全。

Lua脚本是什么?

Lua脚本是redis已经内置的一种轻量小巧语言,其执行是通过redis的eval /evalsha 命令来运行,把操作封装成一个Lua脚本,如论如何都是一次执行的原子操作。

于是2.0版本通过Lua脚本删除

lockDel.lua如下

if redis.call('get', KEYS[1]) == ARGV[1] 
    then 
 -- 执行删除操作
        return redis.call('del', KEYS[1]) 
    else 
 -- 不成功,返回0
        return 0 
end

delete操作时执行Lua命令

// 解锁脚本
DefaultRedisScript<Object> unlockScript = new DefaultRedisScript();
unlockScript.setScriptSource(new ResourceScriptSource(new ClassPathResource("lockDel.lua")));

// 执行lua脚本解锁
redisTemplate.execute(unlockScript, Collections.singletonList(keyName), value);

2.0似乎更像一把锁,但好像又缺少了什么,小张一拍脑袋,synchronized和ReentrantLock都很丝滑,因为他们都是可重入锁,一个线程多次拿锁也不会死锁,我们需要可重入。

怎么保证可重入?

重入就是,同一个线程多次获取同一把锁是允许的,不会造成死锁,这一点synchronized偏向锁提供了很好的思路,synchronized的实现重入是在JVM层面,JAVA对象头MARK WORD中便藏有线程ID和计数器来对当前线程做重入判断,避免每次CAS。

“当一个线程访问同步块并获取锁时,会在对象头和栈帧中的锁记录里存储偏向的线程ID,以后该线程在进入和退出同步块时不需要进行CAS操作来加锁和解锁,只需简单测试一下对象头的Mark Word里是否存储着指向当前线程的偏向锁。如果测试成功,表示线程已经获得了锁。如果测试失败,则需要再测试一下Mark Word中偏向锁标志是否设置成1:没有则CAS竞争;设置了,则CAS将对象头偏向锁指向当前线程。

再维护一个计数器,同个线程进入则自增1,离开再减1,直到为0才能释放”

可重入锁

仿造该方案,我们需改造Lua脚本:

“1.需要存储 锁名称lockName 、获得该锁的线程id 和对应线程的进入次数count

2.加锁

每次线程获取锁时,判断是否已存在该锁

  • 不存在
  • 设置hash的key为线程id,value初始化为1
  • 设置过期时间
  • 返回获取锁成功true
  • 存在
  • 继续判断是否存在当前线程id的hash key
  • 存在,线程key的value + 1,重入次数增加1,设置过期时间
  • 不存在,返回加锁失败

3.解锁

每次线程来解锁时,判断是否已存在该锁

  • 存在
  • 是否有该线程的id的hash key,有则减1,无则返回解锁失败
  • 减1后,判断剩余count是否为0,为0则说明不再需要这把锁,执行del命令删除”

1.存储结构

为了方便维护这个对象,我们用Hash结构来存储这些字段。Redis的Hash类似Java的HashMap,适合存储对象。

a001

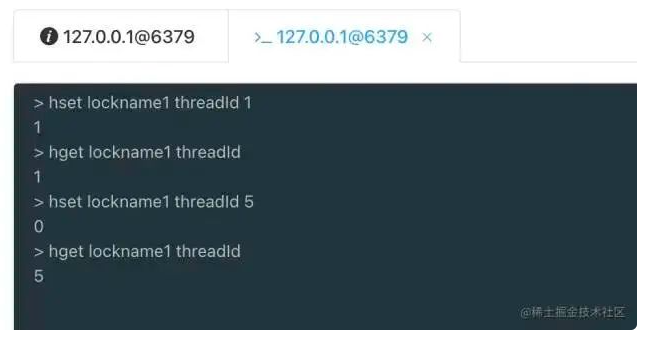
hset lockname1 threadId 1

设置一个名字为lockname1 的hash结构,该hash结构key为threadId ,值value为1

hget lockname1 threadId

获取lockname1的threadId的值

存储结构为

lockname 锁名称
    key1:   threadId   唯一键,线程id
    value1:  count     计数器,记录该线程获取锁的次数

redis中的结构

a002

2.计数器的加减

当同一个线程获取同一把锁时,我们需要将对应线程的计数器count做加减

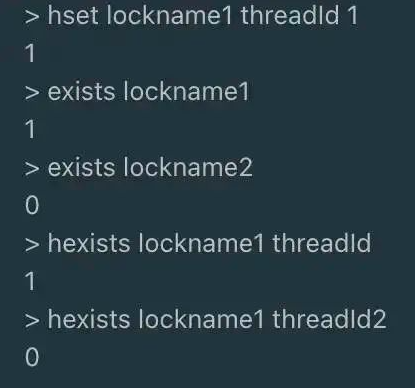
判断一个redis key是否存在,可以用exists,而判断一个hash的key是否存在,可以用hexists

a003

而redis也有hash自增的命令hincrby

每次自增1时 hincrby lockname1 threadId 1,自减1时 hincrby lockname1 threadId -1

3.解锁的判断

当一把锁不再被需要了,每次解锁一次,count减1,直到为0时,执行删除

综合上述的存储结构和判断流程,加锁和解锁Lua如下

加锁 lock.lua

local key = KEYS[1];
local threadId = ARGV[1];
local releaseTime = ARGV[2];

-- lockname不存在
if(redis.call('exists', key) == 0) then
    redis.call('hset', key, threadId, '1');
    redis.call('expire', key, releaseTime);
    return 1;
end;

-- 当前线程已id存在
if(redis.call('hexists', key, threadId) == 1) then
    redis.call('hincrby', key, threadId, '1');
    redis.call('expire', key, releaseTime);
    return 1;
end;
return 0;

解锁 unlock.lua

local key = KEYS[1];
local threadId = ARGV[1];

-- lockname、threadId不存在
if (redis.call('hexists', key, threadId) == 0) then
    return nil;
end;

-- 计数器-1
local count = redis.call('hincrby', key, threadId, -1);

-- 删除lock
if (count == 0) then
    redis.call('del', key);
    return nil;
end;

代码

/**
 * @description 原生redis实现分布式锁
 **/
@Getter
@Setter
public class RedisLock {

    private RedisTemplate redisTemplate;
    private DefaultRedisScript<Long> lockScript;
    private DefaultRedisScript<Object> unlockScript;

    public RedisLock(RedisTemplate redisTemplate) {
        this.redisTemplate = redisTemplate;
        // 加载加锁的脚本
        lockScript = new DefaultRedisScript<>();
        this.lockScript.setScriptSource(new ResourceScriptSource(new ClassPathResource("lock.lua")));
        this.lockScript.setResultType(Long.class);
        // 加载释放锁的脚本
        unlockScript = new DefaultRedisScript<>();
        this.unlockScript.setScriptSource(new ResourceScriptSource(new ClassPathResource("unlock.lua")));
    }

    /**
     * 获取锁
     */
    public String tryLock(String lockName, long releaseTime) {
        // 存入的线程信息的前缀
        String key = UUID.randomUUID().toString();

        // 执行脚本
        Long result = (Long) redisTemplate.execute(
                lockScript,
                Collections.singletonList(lockName),
                key + Thread.currentThread().getId(),
                releaseTime);

        if (result != null && result.intValue() == 1) {
            return key;
        } else {
            return null;
        }
    }

    /**
     * 解锁
     * @param lockName
     * @param key
     */
    public void unlock(String lockName, String key) {
        redisTemplate.execute(unlockScript,
                Collections.singletonList(lockName),
                key + Thread.currentThread().getId()
                );
    }
}

至此已经完成了一把分布式锁,符合互斥、可重入、防死锁的基本特点。

当普通互斥锁,已经稳稳够用,但是业务里总是又很多特殊情况的,

比如A进程在获取到锁的时候,因业务操作时间太长,锁释放了但是业务还在执行,而此刻B进程又可以正常拿到锁做业务操作,两个进程操作就会存在依旧有共享资源的问题 。

而且如果负责储存这个分布式锁的Redis节点宕机以后,而且这个锁正好处于锁住的状态时,这个锁会出现锁死的状态 。

所以我们希望在这种情况时,可以延长锁的releaseTime延迟释放锁来直到完成业务期望结果,这种不断延长锁过期时间来保证业务执行完成的操作就是锁续约。

读写分离也是常见,一个读多写少的业务为了性能,常常是有读锁和写锁的。

3. Redisson分布式锁

号称简单的Redisson分布式锁的使用姿势是什么?

1. 依赖

<!-- 原生,本章使用-->
<dependency>
    <groupId>org.redisson</groupId>
    <artifactId>redisson</artifactId>
    <version>3.13.6</version>
</dependency>

<!-- 另一种Spring集成starter,本章未使用 -->
<dependency>
    <groupId>org.redisson</groupId>
    <artifactId>redisson-spring-boot-starter</artifactId>
    <version>3.13.6</version>
</dependency>

2. 配置

@Configuration
public class RedissionConfig {
    @Value("${spring.redis.host}")
    private String redisHost;

    @Value("${spring.redis.password}")
    private String password;

    private int port = 6379;

    @Bean
    public RedissonClient getRedisson() {
        Config config = new Config();
        config.useSingleServer().
                setAddress("redis://" + redisHost + ":" + port).
                setPassword(password);
        config.setCodec(new JsonJacksonCodec());
        return Redisson.create(config);
    }
}

3. 启用分布式锁

@Resource
private RedissonClient redissonClient;

RLock rLock = redissonClient.getLock(lockName);
try {
    boolean isLocked = rLock.tryLock(expireTime, TimeUnit.MILLISECONDS);
    if (isLocked) {
        // TODO
    }
} catch (Exception e) {
    rLock.unlock();
}

简洁明了,只需要一个RLock,既然推荐Redisson,就往里面看看他是怎么实现的。

4. RLock

RLock是Redisson分布式锁的最核心接口,继承了concurrent包的Lock接口和自己的RLockAsync接口,RLockAsync的返回值都是RFuture,是Redisson执行异步实现的核心逻辑,也是Netty发挥的主要阵地。

RLock如何加锁?

从RLock进入,找到RedissonLock类,找到tryLock 方法再递进到干事的tryAcquireOnceAsync 方法,这是加锁的主要代码(版本不一此处实现有差别,和最新3.15.x有一定出入,但是核心逻辑依然未变。此处以3.13.6为例)

private RFuture<Boolean> tryAcquireOnceAsync(long waitTime, long leaseTime, TimeUnit unit, long threadId) {
    if (leaseTime != -1L) {
        return this.tryLockInnerAsync(waitTime, leaseTime, unit, threadId, RedisCommands.EVAL_NULL_BOOLEAN);
    } else {
        RFuture<Boolean> ttlRemainingFuture = this.tryLockInnerAsync(waitTime, this.commandExecutor.getConnectionManager().getCfg().getLockWatchdogTimeout(), TimeUnit.MILLISECONDS, threadId, RedisCommands.EVAL_NULL_BOOLEAN);
        ttlRemainingFuture.onComplete((ttlRemaining, e) -> {
            if (e == null) {
                if (ttlRemaining) {
                    this.scheduleExpirationRenewal(threadId);
                }

            }
        });
        return ttlRemainingFuture;
    }
}

此处出现leaseTime时间判断的2个分支,实际上就是加锁时是否设置过期时间,未设置过期时间(-1)时则会有watchDog 的锁续约 (下文),一个注册了加锁事件的续约任务。

我们先来看有过期时间tryLockInnerAsync 部分,evalWriteAsync是eval命令执行lua的入口

private RFuture<Boolean> tryAcquireOnceAsync(long waitTime, long leaseTime, TimeUnit unit, long threadId) {
    if (leaseTime != -1L) {
        return this.tryLockInnerAsync(waitTime, leaseTime, unit, threadId, RedisCommands.EVAL_NULL_BOOLEAN);
    } else {
        RFuture<Boolean> ttlRemainingFuture = this.tryLockInnerAsync(waitTime, this.commandExecutor.getConnectionManager().getCfg().getLockWatchdogTimeout(), TimeUnit.MILLISECONDS, threadId, RedisCommands.EVAL_NULL_BOOLEAN);
        ttlRemainingFuture.onComplete((ttlRemaining, e) -> {
            if (e == null) {
                if (ttlRemaining) {
                    this.scheduleExpirationRenewal(threadId);
                }

            }
        });
        return ttlRemainingFuture;
    }
}

这里揭开真面目,eval命令执行Lua脚本的地方,此处的Lua脚本展开

-- 不存在该key时
if (redis.call('exists', KEYS[1]) == 0) then 
  -- 新增该锁并且hash中该线程id对应的count置1
  redis.call('hincrby', KEYS[1], ARGV[2], 1); 
  -- 设置过期时间
  redis.call('pexpire', KEYS[1], ARGV[1]); 
  return nil;
    end; 

-- 存在该key 并且 hash中线程id的key也存在
if (redis.call('hexists', KEYS[1], ARGV[2]) == 1) then 
  -- 线程重入次数++
            redis.call('hincrby', KEYS[1], ARGV[2], 1); 
  redis.call('pexpire', KEYS[1], ARGV[1]); 
  return nil;
    end; 
return redis.call('pttl', KEYS[1]);

和前面我们写自定义的分布式锁的脚本几乎一致,看来redisson也是一样的实现,具体参数分析:

// keyName
    KEYS[1] = Collections.singletonList(this.getName())
// leaseTime
    ARGV[1] = this.internalLockLeaseTime
// uuid+threadId组合的唯一值
    ARGV[2] = this.getLockName(threadId)

总共3个参数完成了一段逻辑:

“判断该锁是否已经有对应hash表存在,

• 没有对应的hash表:则set该hash表中一个entry的key为锁名称,value为1,之后设置该hash表失效时间为leaseTime

• 存在对应的hash表:则将该lockName的value执行+1操作,也就是计算进入次数,再设置失效时间leaseTime

• 最后返回这把锁的ttl剩余时间

也和上述自定义锁没有区别

既然如此,那解锁的步骤也肯定有对应的-1操作,再看unlock方法,同样查找方法名,一路到

protected RFuture<Boolean> unlockInnerAsync(long threadId) {
    return this.commandExecutor.evalWriteAsync(this.getName(), LongCodec.INSTANCE, RedisCommands.EVAL_BOOLEAN, "if (redis.call('exists', KEYS[1]) == 0) then redis.call('publish', KEYS[2], ARGV[1]); return 1; end;if (redis.call('hexists', KEYS[1], ARGV[3]) == 0) then return nil;end; local counter = redis.call('hincrby', KEYS[1], ARGV[3], -1); if (counter > 0) then redis.call('pexpire', KEYS[1], ARGV[2]); return 0; else redis.call('del', KEYS[1]); redis.call('publish', KEYS[2], ARGV[1]); return 1; end; return nil;", Arrays.asList(this.getName(), this.getChannelName()), new Object[]{LockPubSub.unlockMessage, this.internalLockLeaseTime, this.getLockName(threadId)});
}

掏出Lua部分

-- 不存在key
if (redis.call('hexists', KEYS[1], ARGV[3]) == 0) then 
  return nil;
end;
-- 计数器 -1
local counter = redis.call('hincrby', KEYS[1], ARGV[3], -1); 
if (counter > 0) then 
  -- 过期时间重设
  redis.call('pexpire', KEYS[1], ARGV[2]); 
  return 0; 
else
  -- 删除并发布解锁消息
  redis.call('del', KEYS[1]); 
  redis.call('publish', KEYS[2], ARGV[1]); 
  return 1;
end; 
return nil;

该Lua KEYS有2个Arrays.asList(getName(), getChannelName())

name 锁名称
channelName,用于pubSub发布消息的channel名称

ARGV变量有三个LockPubSub.UNLOCK_MESSAGE, internalLockLeaseTime, getLockName(threadId)

LockPubSub.UNLOCK_MESSAGE,channel发送消息的类别,此处解锁为0
internalLockLeaseTime,watchDog配置的超时时间,默认为30s
lockName 这里的lockName指的是uuid和threadId组合的唯一值

步骤如下:

“1.如果该锁不存在则返回nil;

2.如果该锁存在则将其线程的hash key计数器-1,

3.计数器counter>0,重置下失效时间,返回0;否则,删除该锁,发布解锁消息unlockMessage,返回1;

其中unLock的时候使用到了Redis发布订阅PubSub完成消息通知。

而订阅的步骤就在RedissonLock的加锁入口的lock方法里

long threadId = Thread.currentThread().getId();
Long ttl = this.tryAcquire(-1L, leaseTime, unit, threadId);
    if (ttl != null) {
    // 订阅
    RFuture<RedissonLockEntry> future = this.subscribe(threadId);
    if (interruptibly) {
        this.commandExecutor.syncSubscriptionInterrupted(future);
    } else {
        this.commandExecutor.syncSubscription(future);
    }
    // 省略

当锁被其他线程占用时,通过监听锁的释放通知(在其他线程通过RedissonLock释放锁时,会通过发布订阅pub/sub功能发起通知),等待锁被其他线程释放,也是为了避免自旋的一种常用效率手段。

1. 解锁消息

为了一探究竟通知了什么,通知后又做了什么,进入LockPubSub。

这里只有一个明显的监听方法onMessage,其订阅和信号量的释放都在父类PublishSubscribe,我们只关注监听事件的实际操作

protected void onMessage(RedissonLockEntry value, Long message) {
    Runnable runnableToExecute;
    if (message.equals(unlockMessage)) {
        // 从监听器队列取监听线程执行监听回调
        runnableToExecute = (Runnable) value.getListeners().poll();
        if (runnableToExecute != null) {
            runnableToExecute.run();
        }
        // getLatch()返回的是Semaphore,信号量,此处是释放信号量
        // 释放信号量后会唤醒等待的entry.getLatch().tryAcquire去再次尝试申请锁
        value.getLatch().release();
    } else if (message.equals(readUnlockMessage)) {
        while (true) {
            runnableToExecute = (Runnable) value.getListeners().poll();
            if (runnableToExecute == null) {
                value.getLatch().release(value.getLatch().getQueueLength());
                break;
            }
            runnableToExecute.run();
        }
    }
}

发现一个是默认解锁消息 ,一个是读锁解锁消息 ,因为redisson是有提供读写锁的,而读写锁读读情况和读写、写写情况互斥情况不同,我们只看上面的默认解锁消息unlockMessage分支

LockPubSub监听最终执行了2件事

  1. runnableToExecute.run() 执行监听回调
  2. value.getLatch().release(); 释放信号量

Redisson通过LockPubSub 监听解锁消息,执行监听回调和释放信号量通知等待线程可以重新抢锁。

这时再回来看tryAcquireOnceAsync另一分支

private RFuture<Boolean> tryAcquireOnceAsync(long waitTime, long leaseTime, TimeUnit unit, long threadId) {
    if (leaseTime != -1L) {
        return this.tryLockInnerAsync(waitTime, leaseTime, unit, threadId, RedisCommands.EVAL_NULL_BOOLEAN);
    } else {
        RFuture<Boolean> ttlRemainingFuture = this.tryLockInnerAsync(waitTime, this.commandExecutor.getConnectionManager().getCfg().getLockWatchdogTimeout(), TimeUnit.MILLISECONDS, threadId, RedisCommands.EVAL_NULL_BOOLEAN);
        ttlRemainingFuture.onComplete((ttlRemaining, e) -> {
            if (e == null) {
                if (ttlRemaining) {
                    this.scheduleExpirationRenewal(threadId);
                }

            }
        });
        return ttlRemainingFuture;
    }
}

可以看到,无超时时间时,在执行加锁操作后,还执行了一段费解的逻辑

ttlRemainingFuture.onComplete((ttlRemaining, e) -> {
            if (e == null) {
                if (ttlRemaining) {
                    this.scheduleExpirationRenewal(threadId);
                }

            }
        });

此处涉及到Netty的Future/Promise-Listener模型,Redisson中几乎全部以这种方式通信(所以说Redisson是基于Netty通信机制实现的),理解这段逻辑可以试着先理解

“在 Java 的 Future 中,业务逻辑为一个 Callable 或 Runnable 实现类,该类的 call()或 run()执行完毕意味着业务逻辑的完结,在 Promise 机制中,可以在业务逻辑中人工设置业务逻辑的成功与失败,这样更加方便的监控自己的业务逻辑。”

这块代码的表面意义就是,在执行异步加锁的操作后,加锁成功则根据加锁完成返回的ttl是否过期来确认是否执行一段定时任务。

这段定时任务的就是watchDog的核心。

2. 锁续约

查看RedissonLock.this.scheduleExpirationRenewal(threadId)

private void scheduleExpirationRenewal(long threadId) {
    RedissonLock.ExpirationEntry entry = new RedissonLock.ExpirationEntry();
    RedissonLock.ExpirationEntry oldEntry = (RedissonLock.ExpirationEntry) EXPIRATION_RENEWAL_MAP.putIfAbsent(this.getEntryName(), entry);
    if (oldEntry != null) {
        oldEntry.addThreadId(threadId);
    } else {
        entry.addThreadId(threadId);
        this.renewExpiration();
    }

}

private void renewExpiration() {
    RedissonLock.ExpirationEntry ee = (RedissonLock.ExpirationEntry) EXPIRATION_RENEWAL_MAP.get(this.getEntryName());
    if (ee != null) {
        Timeout task = this.commandExecutor.getConnectionManager().newTimeout(new TimerTask() {
            public void run(Timeout timeout) throws Exception {
                RedissonLock.ExpirationEntry ent = (RedissonLock.ExpirationEntry) RedissonLock.EXPIRATION_RENEWAL_MAP.get(RedissonLock.this.getEntryName());
                if (ent != null) {
                    Long threadId = ent.getFirstThreadId();
                    if (threadId != null) {
                        RFuture<Boolean> future = RedissonLock.this.renewExpirationAsync(threadId);
                        future.onComplete((res, e) -> {
                            if (e != null) {
                                RedissonLock.log.error("Can't update lock " + RedissonLock.this.getName() + " expiration", e);
                            } else {
                                if (res) {
                                    RedissonLock.this.renewExpiration();
                                }

                            }
                        });
                    }
                }
            }
        }, this.internalLockLeaseTime / 3L, TimeUnit.MILLISECONDS);
        ee.setTimeout(task);
    }
}

拆分来看,这段连续嵌套且冗长的代码实际上做了几步

“• 添加一个netty的Timeout回调任务,每(internalLockLeaseTime / 3)毫秒执行一次,执行的方法是renewExpirationAsync• renewExpirationAsync重置了锁超时时间,又注册一个监听器,监听回调又执行了renewExpiration

renewExpirationAsync 的Lua如下

protected RFuture<Boolean> renewExpirationAsync(long threadId) {
    return this.commandExecutor.evalWriteAsync(this.getName(), LongCodec.INSTANCE, RedisCommands.EVAL_BOOLEAN, "if (redis.call('hexists', KEYS[1], ARGV[2]) == 1) then redis.call('pexpire', KEYS[1], ARGV[1]); return 1; end; return 0;", Collections.singletonList(this.getName()), new Object[]{this.internalLockLeaseTime, this.getLockName(threadId)});
}

if(redis.call('hexists',KEYS[1],ARGV[2])==1)then 
  redis.call('pexpire',KEYS[1],ARGV[1]); 
  return 1;
    end; 
return 0;

重新设置了超时时间。

Redisson加这段逻辑的目的是什么?

目的是为了某种场景下保证业务不影响,如任务执行超时但未结束,锁已经释放的问题。

当一个线程持有了一把锁,由于并未设置超时时间leaseTime,Redisson默认配置了30S,开启watchDog,每10S对该锁进行一次续约,维持30S的超时时间,直到任务完成再删除锁。

这就是Redisson的锁续约 ,也就是WatchDog 实现的基本思路。

3. 流程概括

通过整体的介绍,流程简单概括:

“A、B线程争抢一把锁,A获取到后,B阻塞

  1. B线程阻塞时并非主动CAS,而是PubSub方式订阅该锁的广播消息
  2. A操作完成释放了锁,B线程收到订阅消息通知
  3. B被唤醒开始继续抢锁,拿到锁”

详细加锁解锁流程总结如下图:

640

5. 公平锁

以上介绍的可重入锁是非公平锁,Redisson还基于Redis的队列(List)和ZSet实现了公平锁

公平的定义是什么?

公平就是按照客户端的请求先来后到排队来获取锁,先到先得,也就是FIFO,所以队列和容器顺序编排必不可少

FairSync

回顾JUC的ReentrantLock公平锁的实现

/**
 * Sync object for fair locks
 */
static final class FairSync extends Sync {
    private static final long serialVersionUID = -3000897897090466540L;

    final void lock() {
        acquire(1);
    }

    /**
     * Fair version of tryAcquire.  Don't grant access unless
     * recursive call or no waiters or is first.
     */
    protected final boolean tryAcquire(int acquires) {
        final Thread current = Thread.currentThread();
        int c = getState();
        if (c == 0) {
            if (!hasQueuedPredecessors() &&
                    compareAndSetState(0, acquires)) {
                setExclusiveOwnerThread(current);
                return true;
            }
        } else if (current == getExclusiveOwnerThread()) {
            int nextc = c + acquires;
            if (nextc < 0)
                throw new Error("Maximum lock count exceeded");
            setState(nextc);
            return true;
        }
        return false;
    }
}

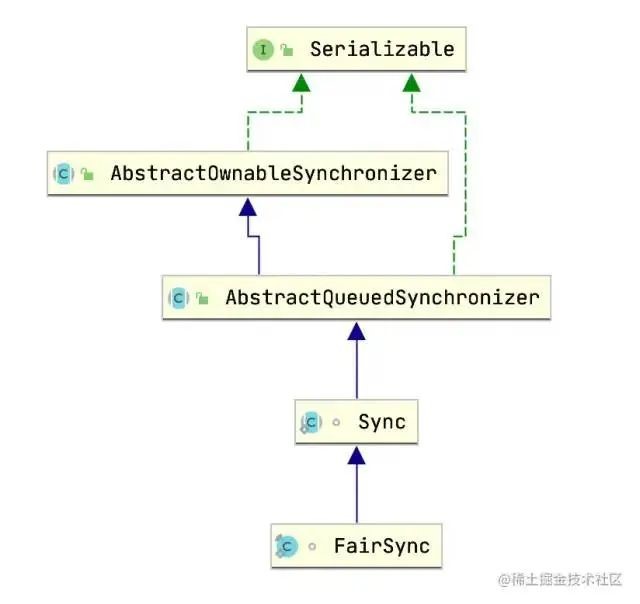
AQS已经提供了整个实现,是否公平取决于实现类取出节点逻辑是否顺序取

640

AbstractQueuedSynchronizer是用来构建锁或者其他同步组件的基础框架,通过内置FIFO队列来完成资源获取线程的排队工作,他自身没有实现同步接口,仅仅定义了若干同步状态获取和释放的方法来供自定义同步组件使用(上图),支持独占和共享获取,这是基于模版方法模式的一种设计,给公平/非公平提供了土壤。

我们用2张图来简单解释AQS的等待流程(出自《JAVA并发编程的艺术》)

一张是同步队列(FIFO双向队列)管理 获取同步状态失败(抢锁失败)的线程引用、等待状态和前驱后继节点的流程图

001

一张是独占式获取同步状态的总流程 ,核心acquire(int arg)方法调用流程

002

可以看出锁的获取流程

“AQS维护一个同步队列,获取状态失败的线程都会加入到队列中进行自旋,移出队列或停止自旋的条件是前驱节点为头节点切成功获取了同步状态。”

而比较另一段非公平锁类NonfairSync可以发现,控制公平和非公平的关键代码,在于hasQueuedPredecessors方法。

static final class NonfairSync extends Sync {
    private static final long serialVersionUID = 7316153563782823691L;

    /**
     * Performs lock.  Try immediate barge, backing up to normal
     * acquire on failure.
     */
    final void lock() {
        if (compareAndSetState(0, 1))
            setExclusiveOwnerThread(Thread.currentThread());
        else
            acquire(1);
    }

    protected final boolean tryAcquire(int acquires) {
        return nonfairTryAcquire(acquires);
    }
}

NonfairSync减少了了hasQueuedPredecessors判断条件,该方法的作用就是

查看同步队列中当前节点是否有前驱节点,如果有比当前线程更早请求获取锁则返回true。

保证每次都取队列的第一个节点(线程)来获取锁,这就是公平规则

为什么JUC以默认非公平锁呢?

“因为当一个线程请求锁时,只要获取来同步状态即成功获取。在此前提下,刚释放的线程再次获取同步状态的几率会非常大,使得其他线程只能在同步队列中等待。但这样带来的好处是,非公平锁大大减少了系统线程上下文的切换开销。”

可见公平的代价是性能与吞吐量。

Redis里没有AQS,但是有List和zSet,看看Redisson是怎么实现公平的。

RedissonFairLock

RedissonFairLock 用法依然很简单

RLock fairLock = redissonClient.getFairLock(lockName);
fairLock.lock();

RedissonFairLock继承自RedissonLock,同样一路向下找到加锁实现方法tryLockInnerAsync 。

这里有2段冗长的Lua,但是Debug发现,公平锁的入口在 command == RedisCommands.EVAL_LONG 之后,此段Lua较长,参数也多,我们着重分析Lua的实现规则

参数

-- lua中的几个参数
KEYS = Arrays.<Object>asList(getName(), threadsQueueName, timeoutSetName)
KEYS[1]: lock_name, 锁名称                   
KEYS[2]: "redisson_lock_queue:{xxx}"  线程队列
KEYS[3]: "redisson_lock_timeout:{xxx}"  线程id对应的超时集合

ARGV =  internalLockLeaseTime, getLockName(threadId), currentTime + threadWaitTime, currentTime
ARGV[1]: "{leaseTime}" 过期时间
ARGV[2]: "{Redisson.UUID}:{threadId}"   
ARGV[3] = 当前时间 + 线程等待时间:(10:00:00) + 5000毫秒 = 10:00:05
ARGV[4] = 当前时间(10:00:00)  部署服务器时间,非redis-server服务器时间

公平锁实现的Lua脚本

-- 1.死循环清除过期key
while true do 
  -- 获取头节点
    local firstThreadId2 = redis.call('lindex', KEYS[2], 0);
    -- 首次获取必空跳出循环
  if firstThreadId2 == false then 
    break;
  end;
  -- 清除过期key
  local timeout = tonumber(redis.call('zscore', KEYS[3], firstThreadId2));
  if timeout <= tonumber(ARGV[4]) then
    redis.call('zrem', KEYS[3], firstThreadId2);
    redis.call('lpop', KEYS[2]);
  else
    break;
  end;
end;

-- 2.不存在该锁 && (不存在线程等待队列 || 存在线程等待队列而且第一个节点就是此线程ID),加锁部分主要逻辑
if (redis.call('exists', KEYS[1]) == 0) and 
  ((redis.call('exists', KEYS[2]) == 0)  or (redis.call('lindex', KEYS[2], 0) == ARGV[2])) then
  -- 弹出队列中线程id元素,删除Zset中该线程id对应的元素
  redis.call('lpop', KEYS[2]);
  redis.call('zrem', KEYS[3], ARGV[2]);
  local keys = redis.call('zrange', KEYS[3], 0, -1);
  -- 遍历zSet所有key,将key的超时时间(score) - 当前时间ms
  for i = 1, #keys, 1 do 
    redis.call('zincrby', KEYS[3], -tonumber(ARGV[3]), keys[i]);
  end;
    -- 加锁设置锁过期时间
  redis.call('hset', KEYS[1], ARGV[2], 1);
  redis.call('pexpire', KEYS[1], ARGV[1]);
  return nil;
end;

-- 3.线程存在,重入判断
if redis.call('hexists', KEYS[1], ARGV[2]) == 1 then
  redis.call('hincrby', KEYS[1], ARGV[2],1);
  redis.call('pexpire', KEYS[1], ARGV[1]);
  return nil;
end;

-- 4.返回当前线程剩余存活时间
local timeout = redis.call('zscore', KEYS[3], ARGV[2]);
    if timeout ~= false then
  -- 过期时间timeout的值在下方设置,此处的减法算出的依旧是当前线程的ttl
  return timeout - tonumber(ARGV[3]) - tonumber(ARGV[4]);
end;

-- 5.尾节点剩余存活时间
local lastThreadId = redis.call('lindex', KEYS[2], -1);
local ttl;
-- 尾节点不空 && 尾节点非当前线程
if lastThreadId ~= false and lastThreadId ~= ARGV[2] then
  -- 计算队尾节点剩余存活时间
  ttl = tonumber(redis.call('zscore', KEYS[3], lastThreadId)) - tonumber(ARGV[4]);
else
  -- 获取lock_name剩余存活时间
  ttl = redis.call('pttl', KEYS[1]);
end;

-- 6.末尾排队
-- zSet 超时时间(score),尾节点ttl + 当前时间 + 5000ms + 当前时间,无则新增,有则更新
-- 线程id放入队列尾部排队,无则插入,有则不再插入
local timeout = ttl + tonumber(ARGV[3]) + tonumber(ARGV[4]);
if redis.call('zadd', KEYS[3], timeout, ARGV[2]) == 1 then
  redis.call('rpush', KEYS[2], ARGV[2]);
end;
return ttl;

1.公平锁加锁步骤

通过以上Lua,可以发现,lua操作的关键结构是列表(list)和有序集合(zSet)。

其中list维护了一个等待的线程队列redisson_lock_queue:{xxx},zSet维护了一个线程超时情况的有序集合redisson_lock_timeout:{xxx},尽管lua较长,但是可以拆分为6个步骤

1.队列清理

  • 保证队列中只有未过期的等待线程

2.首次加锁

  • hset加锁,pexpire过期时间

3.重入判断

  • 此处同可重入锁lua

4.返回ttl

5.计算尾节点ttl

  • 初始值为锁的剩余过期时间

6.末尾排队

  • ttl + 2 * currentTime + waitTime是score的默认值计算公式

2.模拟

如果模拟以下顺序,就会明了redisson公平锁整个加锁流程

假设 t1 10:00:00 < t2 10:00:10 < t3 10:00:20

t1:当线程1初次获取锁

“1.等待队列无头节点,跳出死循环->22.不存在该锁 && 不存在线程等待队列 成立

2.1 lpop和zerm、zincrby都是无效操作,只有加锁生效,说明是首次加锁,加锁后返回nil

加锁成功,线程1获取到锁,结束”

t2:线程2尝试获取锁(线程1未释放锁)

“1.等待队列无头节点,跳出死循环->22.不存在该锁 不成立->3

3.非重入线程 ->4

4.score无值 ->5

5.尾节点为空,设置ttl初始值为lock_name的ttl -> 6

6.按照ttl + waitTime + currentTime + currentTime 来设置zSet超时时间score,并且加入等待队列,线程2为头节点

score = 20S + 5000ms + 10:00:10 + 10:00:10 = 10:00:35 + 10:00:10”

t3:线程3尝试获取锁(线程1未释放锁)

“1.等待队列有头节点1.1未过期->2

2.不存在该锁不成立->3

3.非重入线程->4

4.score无值 ->5

5.尾节点不为空 && 尾节点线程为2,非当前线程

5.1取出之前设置的score,减去当前时间:ttl = score – currentTime ->6

6.按照ttl + waitTime + currentTime + currentTime 来设置zSet超时时间score,并且加入等待队列

score = 10S + 5000ms + 10:00:20 + 10:00:20 = 10:00:35 + 10:00:20”

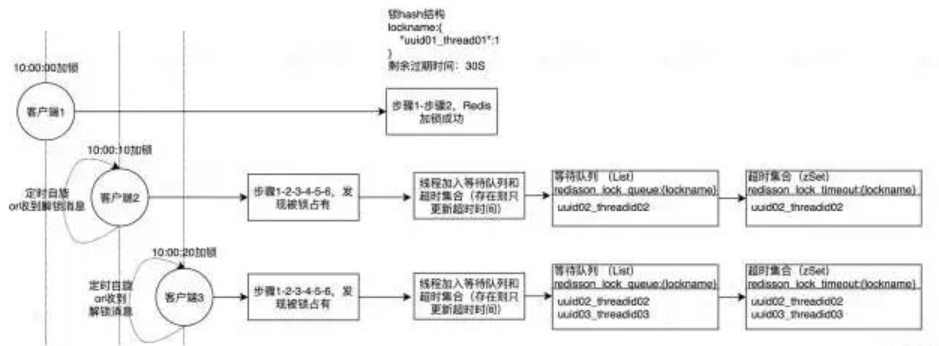
如此一来,三个需要抢夺一把锁的线程,完成了一次排队,在list中排列他们等待线程id,在zSet中存放过期时间(便于排列优先级)。其中返回ttl的线程2客户端、线程3客户端将会一直按一定间隔自旋重复执行该段Lua,尝试加锁,如此一来便和AQS有了异曲同工之处。

而当线程1释放锁之后(这里依旧有通过Pub/Sub发布解锁消息,通知其他线程获取)

10:00:30 线程2尝试获取锁(线程1已释放锁)

“1.等待队列有头节点,未过期->22.不存在该锁 & 等待队列头节点是当前线程 成立

2.1删除当前线程的队列信息和zSet信息,超时时间为:

线程2 10:00:35 + 10:00:10 – 10:00:30 = 10:00:15

线程3 10:00:35 + 10:00:20 – 10:00:30 = 10:00:25

2.2线程2获取到锁,重新设置过期时间

加锁成功,线程2获取到锁,结束”

排队结构如图

001

公平锁的释放脚本和重入锁类似,多了一步加锁开头的清理过期key的while true逻辑,在此不再展开篇幅描述。

由上可以看出,Redisson公平锁的玩法类似于延迟队列的玩法,核心都在Redis的List和zSet结构的搭配,但又借鉴了AQS实现,在定时判断头节点上如出一辙(watchDog),保证了锁的竞争公平和互斥。并发场景下,lua脚本里,zSet的score很好地解决了顺序插入的问题,排列好优先级。

并且为了防止因异常而退出的线程无法清理,每次请求都会判断头节点的过期情况给予清理,最后释放时通过CHANNEL通知订阅线程可以来获取锁,重复一开始的步骤,顺利交接到下一个顺序线程。

6. 总结

Redisson整体实现分布式加解锁流程的实现稍显复杂,作者Rui Gu对Netty和JUC、Redis研究深入,利用了很多高级特性和语义,值得深入学习,本次介绍也只是单机Redis下锁实现。

Redisson也提供了多机情况下的联锁MultiLock:

“https://github.com/redisson/redisson/wiki/8.-分布式锁和同步器#81-可重入锁reentrant-lock”

和官方推荐的红锁RedLock:

“https://github.com/redisson/redisson/wiki/8.-分布式锁和同步器#84-红锁redlock”

所以,当你真的需要分布式锁时,不妨先来Redisson里找找。

WRONGTYPE Operation against a key holding the wrong kind of value

redis报错:

2022/07/20 18:12:32.277 ERROR [0a2cd65e1bef3f0c][task-304318095] o.s.a.i.SimpleAsyncUncaughtExceptionHandler : Unexpected exception occurred invoking async method: public void com.test.app.system.bus.listener.DeviceUpwardListener.onApplicationEvent(com.test.app.system.bus.e.DeviceEvent)
redis.clients.jedis.exceptions.JedisDataException: WRONGTYPE Operation against a key holding the wrong kind of value
at redis.clients.jedis.Protocol.processError(Protocol.java:132) ~[jedis-3.1.0.jar!/:na]
at redis.clients.jedis.Protocol.process(Protocol.java:166) ~[jedis-3.1.0.jar!/:na]
at redis.clients.jedis.Protocol.read(Protocol.java:220) ~[jedis-3.1.0.jar!/:na]
at redis.clients.jedis.Connection.readProtocolWithCheckingBroken(Connection.java:318) ~[jedis-3.1.0.jar!/:na]
at redis.clients.jedis.Connection.getIntegerReply(Connection.java:260) ~[jedis-3.1.0.jar!/:na]
at redis.clients.jedis.BinaryJedis.hexists(BinaryJedis.java:1034) ~[jedis-3.1.0.jar!/:na]


原因是写入redis的key存在两个(多个),但是类型不一样;

如:

jedis.set(“test”,1);

jedis.hset(“test”,”key”1);

此时testkey就存在两种类型且两个,则有可能会报这个错误。

解决方法就是删除重复的键值,建议每一种set方法都加入一个redis方法名作为前缀,这样子就不可能会出现重复的键。

如:

jedis.set(“set:test”,1);

jedis.hset(“hset:test”,”key”1);

分布式锁的三种实现方式

分布式锁三种实现方式:

  1. 基于数据库实现分布式锁;
  2. 基于缓存(Redis等)实现分布式锁;
  3. 基于Zookeeper实现分布式锁;

一, 基于数据库实现分布式锁

1. 悲观锁

利用select … where … for update 排他锁

*其他附加功能与实现一基本一致,这里需要注意的是“where name=lock ”,name字段必须要走索引,否则会锁表。有些情况下,比如表不大,mysql优化器会不走这个索引,导致锁表问题。

2. 乐观锁

所谓乐观锁与前边最大区别在于基于CAS思想,是不具有互斥性,不会产生锁等待而消耗资源,操作过程中认为不存在并发冲突,只有update version失败后才能觉察到。

我们的抢购、秒杀就是用了这种实现以防止超卖。通过增加递增的版本号字段实现乐观锁

1637136916-5676-e3b761944edd6611defde7ee28-0

二, 基于缓存(Redis等)实现分布式锁

1. 使用命令介绍:

(1)SETNX
SETNX key val:当且仅当key不存在时,set一个key为val的字符串,返回1;若key存在,则什么都不做,返回0。
(2)expire
expire key timeout:为key设置一个超时时间,单位为second,超过这个时间锁会自动释放,避免死锁。
(3)delete
delete key:删除key

在使用Redis实现分布式锁的时候,主要就会使用到这三个命令。

2. 实现思想:

(1)获取锁的时候,使用setnx加锁,并使用expire命令为锁添加一个超时时间,超过该时间则自动释放锁,锁的value值为一个随机生成的UUID,通过此在释放锁的时候进行判断。
(2)获取锁的时候还设置一个获取的超时时间,若超过这个时间则放弃获取锁。
(3)释放锁的时候,通过UUID判断是不是该锁,若是该锁,则执行delete进行锁释放。

3. 分布式锁的简单实现代码:

package com.demo.app;

import redis.clients.jedis.Jedis;
import redis.clients.jedis.JedisPool;
import redis.clients.jedis.Transaction;
import redis.clients.jedis.exceptions.JedisException;

import java.util.List;
import java.util.UUID;

/**
 * 分布式锁的简单实现代码
 */
class DistributedLock {

    private final JedisPool jedisPool;

    public DistributedLock(JedisPool jedisPool) {
        this.jedisPool = jedisPool;
    }

    /**
     * 加锁
     *
     * @param lockName       锁的key
     * @param acquireTimeout 获取超时时间
     * @param timeout        锁的超时时间
     * @return 锁标识
     */

    public String lockWithTimeout(String lockName, long acquireTimeout, long timeout) {

        Jedis conn = null;
        String retIdentifier = null;
        try {
            // 获取连接
            conn = jedisPool.getResource();
            // 随机生成一个value
            String identifier = UUID.randomUUID().toString();
            // 锁名,即key值
            String lockKey = "lock:" + lockName;
            // 超时时间,上锁后超过此时间则自动释放锁
            int lockExpire = (int) (timeout / 1000);
            // 获取锁的超时时间,超过这个时间则放弃获取锁
            long end = System.currentTimeMillis() + acquireTimeout;

            while (System.currentTimeMillis() < end) {
                if (conn.setnx(lockKey, identifier) == 1) {
                    conn.expire(lockKey, lockExpire);
                    // 返回value值,用于释放锁时间确认
                    retIdentifier = identifier;
                    return retIdentifier;
                }

                // 返回-1代表key没有设置超时时间,为key设置一个超时时间
                if (conn.ttl(lockKey) == -1) {
                    conn.expire(lockKey, lockExpire);
                }
                try {
                    Thread.sleep(10);
                } catch (InterruptedException e) {
                    Thread.currentThread().interrupt();
                }
            }
        } catch (JedisException e) {
            e.printStackTrace();
        } finally {
            if (conn != null) {
                conn.close();
            }
        }
        return retIdentifier;
    }

    /**
     * 释放锁
     *
     * @param lockName   锁的key
     * @param identifier 释放锁的标识
     * @return
     */
    public boolean releaseLock(String lockName, String identifier) {
        Jedis conn = null;
        String lockKey = "lock:" + lockName;
        boolean retFlag = false;

        try {
            conn = jedisPool.getResource();
            while (true) {
                // 监视lock,准备开始事务
                conn.watch(lockKey);
                // 通过前面返回的value值判断是不是该锁,若是该锁,则删除,释放锁
                if (identifier.equals(conn.get(lockKey))) {
                    Transaction transaction = conn.multi();
                    transaction.del(lockKey);
                    List<Object> results = transaction.exec();
                    if (results == null) {
                        continue;
                    }
                    retFlag = true;
                }
                conn.unwatch();
                break;
            }
        } catch (JedisException e) {
            e.printStackTrace();
        } finally {
            if (conn != null) {
                conn.close();
            }
        }
        return retFlag;
    }
}

4. 测试刚才实现的分布式锁

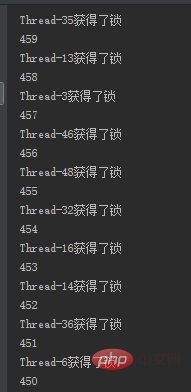
例子中使用50个线程模拟秒杀一个商品,使用–运算符来实现商品减少,从结果有序性就可以看出是否为加锁状态。
模拟秒杀服务,在其中配置了jedis线程池,在初始化的时候传给分布式锁,供其使用。

public class Service {
    private static JedisPool pool = null;
    private DistributedLock lock = new DistributedLock(pool);
    int n = 500;
    
    static {
        JedisPoolConfig config = new JedisPoolConfig();
        // 设置最大连接数
        config.setMaxTotal(200);
        // 设置最大空闲数
        config.setMaxIdle(8);
        // 设置最大等待时间
        config.setMaxWaitMillis(1000 * 100);
        // 在borrow一个jedis实例时,是否需要验证,若为true,则所有jedis实例均是可用的
        config.setTestOnBorrow(true);
        pool = new JedisPool(config, "127.0.0.1", 6379, 3000);

    }

    public void secKill() {
        // 返回锁的value值,供释放锁时候进行判断
        String identifier = lock.lockWithTimeout("resource", 5000, 1000);
        System.out.println(Thread.currentThread().getName() + "获得了锁");
        System.out.println(--n);
        lock.releaseLock("resource", identifier);

    }
}

模拟线程进行秒杀服务;

public class ThreadA extends Thread {
    private Service service;
    public ThreadA(Service service) {
        this.service = service;
    }
    
    @Override
    public void run() {
        service.secKill();
    }
}

public class Test {
    public static void main(String[] args) {
        Service service = new Service();
        for (int i = 0; i < 50; i++) {
            ThreadA threadA = new ThreadA(service);
            threadA.start();
        }
    }
}

结果如下,结果为有序的:

1637136917-5764-ceea4c8cbfa184228a02822f99-1

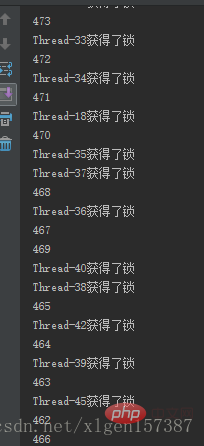
若注释掉使用锁的部分:

public void secKill() {
    // 返回锁的value值,供释放锁时候进行判断
    //String indentifier = lock.lockWithTimeout("resource", 5000, 1000);
    System.out.println(Thread.currentThread().getName() + "获得了锁");
    System.out.println(--n);
    //lock.releaseLock("resource", indentifier);
}

从结果可以看出,有一些是异步进行的:

1637136917-6356-ceea4c8cbfa184228a02822f99-2

三, 基于Zookeeper实现分布式锁

ZooKeeper是一个为分布式应用提供一致性服务的开源组件,它内部是一个分层的文件系统目录树结构,规定同一个目录下只能有一个唯一文件名。基于ZooKeeper实现分布式锁的步骤如下:

  • (1)创建一个目录mylock;
  • (2)线程A想获取锁就在mylock目录下创建临时顺序节点;
  • (3)获取mylock目录下所有的子节点,然后获取比自己小的兄弟节点,如果不存在,则说明当前线程顺序号最小,获得锁;
  • (4)线程B获取所有节点,判断自己不是最小节点,设置监听比自己次小的节点;
  • (5)线程A处理完,删除自己的节点,线程B监听到变更事件,判断自己是不是最小的节点,如果是则获得锁。

这里推荐一个Apache的开源库Curator,它是一个ZooKeeper客户端,Curator提供的InterProcessMutex是分布式锁的实现,acquire方法用于获取锁,release方法用于释放锁。

实现源码如下:

public class ZkLock implements DistributionLock {

    private String zkAddress = "zk_adress";
    private static final String root = "package root";
    private CuratorFramework zkClient;
    private final String LOCK_PREFIX = "/lock_";
    
    @Bean
    public DistributionLock initZkLock() {
        if (StringUtils.isBlank(root)) {
            throw new RuntimeException("zookeeper 'root' can't be null");
        }
        zkClient = CuratorFrameworkFactory
                .builder()
                .connectString(zkAddress)
                .retryPolicy(new RetryNTimes(2000, 20000))
                .namespace(root)
                .build();
        zkClient.start();
        return this;
    }

    public boolean tryLock(String lockName) {
        lockName = LOCK_PREFIX + lockName;
        boolean locked = true;

        try {
            Stat stat = zkClient.checkExists().forPath(lockName);
            if (stat == null) {
                log.info("tryLock:{}", lockName);
                stat = zkClient.checkExists().forPath(lockName);
                if (stat == null) {
                    zkClient
                            .create()
                            .creatingParentsIfNeeded()
                            .withMode(CreateMode.EPHEMERAL)
                            .forPath(lockName, "1".getBytes());
                } else {
                    log.warn("double-check stat.version:{}", stat.getAversion());
                    locked = false;
                }
            } else {
                log.warn("check stat.version:{}", stat.getAversion());
                locked = false;
            }

        } catch (Exception e) {
            locked = false;
        }
        return locked;
    }

    public void release(String lockName) {
        lockName = LOCK_PREFIX + lockName;
        try {
            zkClient
                    .delete()
                    .guaranteed()
                    .deletingChildrenIfNeeded()
                    .forPath(lockName);
            log.info("release:{}", lockName);
        } catch (Exception e) {
            log.error("删除", e);
        }

    }

    public void setZkAddress(String zkAddress) {
        this.zkAddress = zkAddress;
    }

}

优点:具备高可用、可重入、阻塞锁特性,可解决失效死锁问题。

缺点:因为需要频繁的创建和删除节点,性能上不如Redis方式。

四,对比

数据库分布式锁实现

缺点:

1.db操作性能较差,并且有锁表的风险

2.非阻塞操作失败后,需要轮询,占用cpu资源;

3.长时间不commit或者长时间轮询,可能会占用较多连接资源

Redis(缓存)分布式锁实现

缺点:

1.锁删除失败 过期时间不好控制

2.非阻塞,操作失败后,需要轮询,占用cpu资源;

ZK分布式锁实现

缺点:性能不如redis实现,主要原因是写操作(获取锁释放锁)都需要在Leader上执行,然后同步到follower。

ZooKeeper有较好的性能和可靠性。

从理解的难易程度角度(从低到高)数据库 > 缓存 > Zookeeper

从实现的复杂性角度(从低到高)Zookeeper >= 缓存 > 数据库

从性能角度(从高到低)缓存 > Zookeeper >= 数据库

从可靠性角度(从高到低)Zookeeper > 缓存 > 数据库

 
Copyright © 2008-2021 lanxinbase.com Rights Reserved. | 粤ICP备14086738号-3 |