go语言很简单,只要有一定的编程基础都很容易使用它来编写一些程序,学完了go lang的语法,习惯写一个小程序,这里我写了一个简易的文章系统,非常简单。
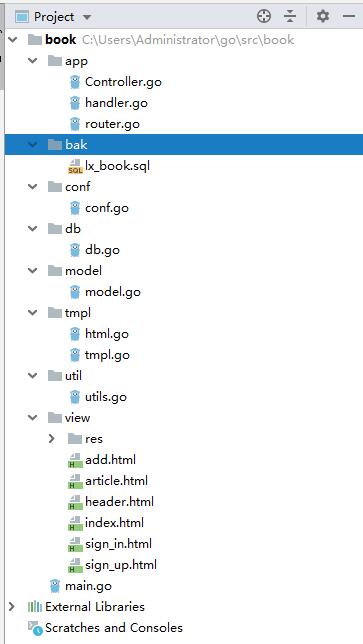
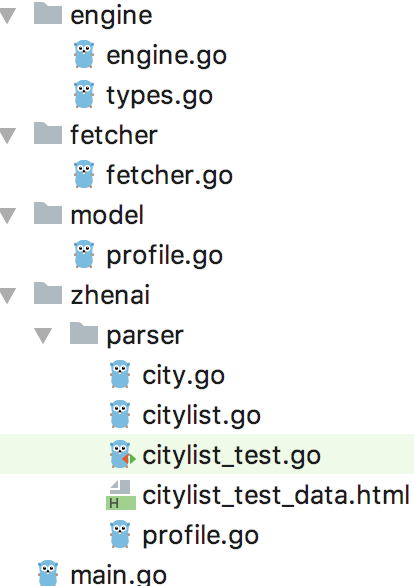
目录结构如下:
1、main.go
func main()  {
   //文件系统
   //fs := http.FileSystem(http.Dir("e:/tools"))
   //http.Handle("/", http.FileServer(fs))
   //log.Fatal(http.ListenAndServe(":8080", nil))

   port := "8080"
   web := http.Server{
      Addr:           ":"+port,
      Handler:        app.HttpHandler(),
      ReadTimeout:    10 * time.Second,
      WriteTimeout:   10 * time.Second,
      MaxHeaderBytes: 1 << 20,
   }

   app.Router()

   log.Printf("Listening on port %s", port)
   log.Printf("Open http://localhost:%s in the browser", port)

   log.Fatal(web.ListenAndServe())
}
首先我们从入口类开始,main()的方法,首先实例化了一个web服务器对象,传入了port跟Handler,handler使用的是一个全局性,也就是说所有的请求都会指向app.HttpHandler()。
接着调用app.Router()方法,初始化一些router,代码待会贴上。
2、Router.go
type route struct {
   path       string
   method     string
   authorized bool
   handler    func(http.ResponseWriter, *http.Request)
}

const (
   GET    = "GET"
   POST   = "POST"
   PUT    = "PUT"
   DELETE = "DELETE"
   OPTION = "OPTION"
   HEADER = "HEADER"
)

var (
   routes map[string]route
)

func Router() {
   //http.HandleFunc("/", indexHandler)
   routes = map[string]route{}
   routes["/"] = route{path: "/", method: GET, authorized: false, handler: indexHandler}
   routes["/view/res/*"] = route{path: "/", method: GET, authorized: false, handler: resourcesHandler}
   routes["/user"] = route{path: "/user", method: GET, authorized: true, handler: indexHandler}
   routes["/add"] = route{path: "/add", method: GET, authorized: true, handler: addHandler}
   routes["/save"] = route{path: "/edit", method: POST, authorized: true, handler: addSaveHandler}
   routes["/view"] = route{path: "/view", method: GET, authorized: false, handler: viewHandler}
   routes["/sign/in"] = route{path: "/sign/up", method: GET, authorized: false, handler: signInHandler}
   routes["/sign/up"] = route{path: "/sign/up", method: GET, authorized: false, handler: signUpHandler}
   routes["/doSignIn"] = route{path: "/doSignIn", method: POST, authorized: false, handler: signInSaveHandler}
   routes["/doSignUp"] = route{path: "/doSignUp", method: POST, authorized: false, handler: signUpSaveHandler}
}

func NewRouter(key string) (r route, ok bool) {
   if strings.Contains(key, "/view/res/") {
      key = "/view/res/*"
   }
   r, err := routes[key]
   return r, err
}
router需要一个类型来保存路由的基本信息,所以这里申明一个route类型对象,route类型:
- path string //路由的路径
- method string //方法名
- authorized bool //是否授权
- handler func(http.ResponseWriter, *http.Request) //处理函数
3、handler.go
const (
   ERROR_NOT_FOUND    = "ERROR_NOT_FOUND"
   ERROR_NOT_METHOD   = "ERROR_NOT_METHOD"
   ERROR_AUTH_INVALID = "ERROR_AUTH_INVALID"
)

var (
   mutex sync.Mutex
   wg    sync.WaitGroup
)

func init() {
   wg.Add(100)
}

func HttpHandler() http.HandlerFunc {
   return func(w http.ResponseWriter, r *http.Request) {
      log.Println(r.Header.Get("Accept"))
      log.Println(r.Header.Get("User-Agent"))
      log.Println(r.Header)
      log.Println(r.Proto, r.Host, r.Method, r.URL.Path)

      token, _ := r.Cookie("token")
      log.Println("token", token)

      //if strings.Index(r.URL.Path,"/view/res/") == 0 {
      // resourcesHandler(w,r)
      // return
      //}
      route, ok := NewRouter(r.URL.Path)
      if !ok {
         errorHandler(w, r, ERROR_NOT_FOUND)
         return
      }
      if r.Method != route.method {
         errorHandler(w, r, ERROR_NOT_METHOD)
         return
      }
      if route.authorized && token != nil && len(token.Value) < 32 {
         errorHandler(w, r, ERROR_AUTH_INVALID)
         return
      }

      route.handler(w, r)
   }
}

func errorHandler(w http.ResponseWriter, r *http.Request, s string) {
   if s == ERROR_NOT_FOUND {
      http.NotFound(w, r)
      return
   }
   if s == ERROR_NOT_METHOD {
      http.Error(w, http.StatusText(http.StatusMethodNotAllowed), http.StatusMethodNotAllowed)
      return
   }
   http.Error(w, http.StatusText(http.StatusNonAuthoritativeInfo), http.StatusNonAuthoritativeInfo)
   return
}

func resourcesHandler(w http.ResponseWriter, r *http.Request) {
   filePath := conf.ROOT + string([]byte(r.URL.Path)[1:])

   //file, err := os.OpenFile(filePath, os.O_RDONLY, 066)
   //defer file.Close()
   //if err != nil {
   // fmt.Println("not found", filePath)
   // return
   //}
   http.ServeFile(w, r, filePath)
}
这里没有用到WaitGroup,只是申明的时候忘记删除了。
主要的函数HttpHandler(),这时一个公共函数,类似于http的调度者,所有的请求都会call这个函数,然后再通过这个函数去分配控制器(route.handler(w, r))。
资源文件处理函数resourcesHandler(),这个函数是将go http服务器中的js、css、image等这些静态资源直接输出,开始不知道有http.ServeFile(w, r, string)这个函数,所以使用了最基本的os读取文件的方式把文件输出出去,其实如果全心投入到go语言,那么真的需要很好地去了解一下go语言的SDK。
3、Controller.go
func indexHandler(w http.ResponseWriter, r *http.Request) {
   util.Output(w, tmpl.Index(r), util.PUT_HTML)
}
这里我只展示了一个函数,其余的函数都是一样的,这里使用了工具类,把信息输出给用户,其中信息的处理交给了tmpl.go的文件。
4、tmpl.go
package tmpl

import (
   "book/model"
   "book/util"
   "fmt"
   "net/http"
   "strconv"
   "strings"
)

func init() {

}

func Index(r *http.Request) string {
   //return "Hello, World!"
   h := NewHtml();
   //h.body("<h1>Hello, World</h1>")
   //h.body(util.GetViewTpl("index.html"))

   list := model.GetArticles("select * from lx_article order by id desc")
   var str string
   tml := `
      <div class="row">
        <div class="col-left">
         <img src="/view/res/img/file_101.353.png" class="img128"/>
            <a href="/view?id=%d" target="_blank">%s</a>
      </div>
        <div class="col-right">%s</div>
        <div class="col-right1"><a href="#">%s</a></div>
    </div>`
   for _, s := range list {
      str += fmt.Sprintf(tml, s.Id, s.Title, s.CreateTimeF, s.User.Username)
   }
   h.body(strings.Replace(util.GetViewTpl("index.html"), "{{content}}", str, -1))
   return h.Show("首页")
}
这个文件比较负责,设计了html的代码,我没有时间去编写模板引擎,所以使用了比较简单的字符替换的方式,把模板输出出去,其实在生产环境中,我们很有必要编写一个模板引起,不过现在流行的是前后端分离,所有的请求,都是通过接口的形式去调去,那么在实际应用中这一层是用不上的,但是为了实现一个简易的文章系统,这里我还是编写出这样不人性化的代码。
核心代码还有很多比如:数据库、模型等到,这里不一一贴出,帖子的最后会附上整个项目的源代码地址,现在我们来看看截图:
用户登录
发表文章:
首页的效果图:
查看文章:
项目地址:




近期评论