(一):jdk和jre的改变
JDK和JRE已经在Java SE 9中进行了模块化处理。在Java SE 9之前,JDK构建系统用于生成两种类型的运行时映像 ——Java运行时环境(JRE)和Java开发工具包(JDK)。 JRE是Java SE平台的完整实现,JDK包含了JRE和开发工具和类库。
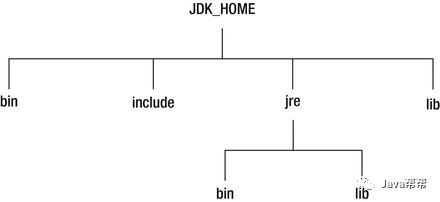
可下图显示了Java SE 9之前的JDK安装中的主目录。JDK_HOME是安装JDK的目录。 如果你只安装了JRE,那么你只有在jre目录下的目录。
在 Java SE 9之前,JDK中:
bin目录用于包含命令行开发和调试工具,如javac,jar和javadoc。 它还用于包含Java命令来启动Java应用程序。
include目录包含在编译本地代码时使用的C/C++头文件。
lib目录包含JDK工具的几个JAR和其他类型的文件。 它有一个tools.jar文件,其中包含javac编译器的Java类。
jre\bin目录包含基本命令,如java命令。 在Windows平台上,它包含系统的运行时动态链接库(DLL)。
jre\lib目录包含用户可编辑的配置文件,如.properties和.policy文件。
jre\lib\approved目录包含允许使用标准覆盖机制的JAR。 这允许在Java社区进程之外创建的实施标准或独立技术的类和接口的更高版本被并入Java平台。 这些JAR被添加到JVM的引导类路径中,从而覆盖了Java运行时中存在的这些类和接口的任何定义。
jre\lib\ext目录包含允许扩展机制的JAR。 该机制通过扩展类加载器(该类加载器)加载了该目录中的所有JAR,该引导类加载器是系统类加载器的子进程,它加载所有应用程序类。 通过将JAR放在此目录中,可以扩展Java SE平台。 这些JAR的内容对于在此运行时映像上编译或运行的所有应用程序都可见。
jre\lib目录包含几个JAR。 rt.jar文件包含运行时的Java类和资源文件。 许多工具依赖于rt.jar文件的位置。
jre\lib目录包含用于非Windows平台的动态链接本地库。
jre\lib目录包含几个其他子目录,其中包含运行时文件,如字体和图像。
Java SE 9调整了JDK的目录层次结构,并删除了JDK和JRE之间的区别。 下图显示了Java SE 9中JDK安装的目录。JDK 9中的JRE安装不包含include和jmods目录。
在Java SE 9 的JDK中: 没有名为jre的子目录。 bin目录包含所有命令。 在Windows平台上,它继续包含系统的运行时动态链接库。 conf目录包含用户可编辑的配置文件,例如以前位于jre\lib目录中的.properties和.policy文件。 include目录包含要在以前编译本地代码时使用的C/C++头文件。 它只存在于JDK中。 jmods目录包含JMOD格式的平台模块。 创建自定义运行时映像时需要它。 它只存在于JDK中。 legal 目录包含法律声明。 lib目录包含非Windows平台上的动态链接本地库。 其子目录和文件不应由开发人员直接编辑或使用。
(二):访问资源
资源是应用程序使用的数据,例如图像,音频,视频,文本文件等。Java提供了一种通过在类路径上定位资源来访问资源的位置无关的方式。 需要与在JAR中打包类文件相同的方式打包资源,并将JAR添加到类路径。 通常,类文件和资源打包在同一个JAR中。 访问资源是每个Java开发人员执行的重要任务。
1. 在JDK 9之前访问资源
在Java代码中,资源由资源名称标识,资源名称是由斜线(/)分隔的一串字符串。 对于存储在JAR中的资源,资源名称仅仅是存储在JAR中的文件的路径。
例如,在JDK 9之前,存储在rt.jar中的java.lang包中的Object.class文件是一个资源,其资源名称是java/lang/Object.class。 在JDK 9之前,可以使用以下两个类中的方法来访问资源:
java.lang.Class java.lang.ClassLoader资源由ClassLoader定位。 一个Class代理中的资源寻找方法到它的ClassLoader。 因此,一旦了解ClassLoader使用的资源加载过程,将不会在使用Class类的方法时遇到问题。
在两个类中有两种不同的命名实例方法:
- URL getResource(String name)
- InputStream getResourceAsStream(String name)
两种方法都会以相同的方式找到资源。 它们的差异仅在于返回类型。 第一个方法返回一个URL,而第二个方法返回一个InputStream。 第二种方法相当于调用第一种方法,然后在返回的URL对象上调用openStream()。
ClassLoader类包含三个额外的查找资源的静态方法:
- static URL getSystemResource(String name)
- static InputStream getSystemResourceAsStream(String name)
- static Enumeration<URL> getSystemResources(String name)
这些方法使用系统类加载器(也称为应用程序类加载器)来查找资源。 第一种方法返回找到的第一个资源的URL。 第二种方法返回找到的第一个资源的InputStream。 第三种方法返回使用指定的资源名称找到的所有资源的URL枚举。 要找到资源,有两种类型的方法可以从——getSystemResource*和getResource*中进行选择。 在讨论哪种方法是最好的之前,重要的是要了解有两种类型的资源: 系统资源非系统资源你必须了解他们之间的区别,以了解资源查找机制。
系统资源是在bootstrap类路径,扩展目录中的JAR和应用程序类路径中找到的资源。
非系统资源可以存储在除路径之外的位置,例如在特定目录,网络上或数据库中。
getSystemResource()方法使用应用程序类加载程序找到一个资源,委托给它的父类,它是扩展类加载器,后者又委托给它的父类(引导类加载器)。如果你的应用程序是独立的应用程序,并且它只使用三个内置的JDK类加载器,那么你将很好的使用名为getSystemResource *的静态方法。它将在类路径中找到所有资源,包括运行时映像中的资源,如rt.jar文件。如果你的应用程序是在浏览器中运行的小程序,或在应用程序服务器和Web服务器中运行的企业应用程序,则应使用名为getResource*的实例方法,它可以使用特定的类加载器来查找资源。如果在Class对象上调用getResource*方法,则会使用当前类加载器(加载Class对象的类加载器)来查找资源。 传递给ClassLoader类中所有方法的资源名称都是绝对的,它们不以斜线(/)开头。
例如,当调用ClassLoader的getSystemResource()方法时,将使用java/lang/Object.class作为资源名称。 Class类中的资源查找方法可以指定绝对和相对资源名称。绝对资源名称以斜线开头,而相对资源名称不用。 当使用绝对名称时,Class类中的方法会删除前导斜线并委派给加载Class对象的类加载器来查找资源。 以下调用 Test.class.getResource(“/resources/test.config”); 会被转换成 Test.class.getClassLoader().getResource(“resources/test.config”); 当使用相对名称时,Class类中的方法预先添加了包名称,在使用斜线后跟斜线替换包名中的点,然后再委托加载Class对象的类加载器来查找资源。 假设测试类在com.jdojo.test包中,以下调用: Test.class.getResource(“resources/test.config”); 会被转换成 Test.class.getClassLoader().getResource(“com/jdojo/test/resources/test.config”);
2. 在JDK 9 中访问资源
在JDK 9之前,可以从类路径上的任何JAR访问资源。 在JDK 9中,类和资源封装在模块中。 在第一次尝试中,JDK 9设计人员强制执行模块封装规则,模块中的资源必须对该模块是私有的,因此它们只能在该模块内的代码中访问。 虽然这个规则在理论上看起来很好,但是对于跨模块共享资源的框架和加载的类文件作为来自其他模块的资源,就会带来问题。 为了有限地访问模块中的资源,做了一些妥协,但是仍然强制执行模块的封装。
JDK 9包含三类资源查找方法:
- java.lang.Class java.lang.ClassLoader
- java.lang.Module Class
- ClassLoader类没新增任何新的方法。
Module类包含一个getResourceAsStream(String name)方法,如果找到该资源,返回一个InputStream;否则返回null。
(三):模块化
模块化特性是Java 9 最大的一个特性,Java 9起初的代号就叫Jigsaw,后来被更改为Modularity,Modularity提供了类似于OSGI框架的功能,模块之间存在相互的依赖关系,可以导出一个公共的API,并且隐藏实现的细节,Java提供该功能的主要的动机在于,减少内存的开销,我们大家都知道,在JVM启动的时候,至少会有30~60MB的内存加载,主要原因是JVM需要加载rt.jar,不管其中的类是否被classloader加载,第一步整个jar都会被JVM加载到内存当中去,模块化可以根据模块的需要加载程序运行需要的class,那么JVM是如何知道需要加载那些class的呢?这就是在Java 9 中引入的一个新的文件module.java我们大致来看一下一个例子(module-info.java)
module com.lanxinbase.java9.modules.car
{
    requires com.lanxinbase.java9.modules.engines;
    exports com.lanxinbase.java9.modules.car.handling;
}
Java 平台级模块系统
Java 9的定义功能是一套全新的模块系统。当代码库越来越大,创建复杂,盘根错节的“意大利面条式代码”的几率呈指数级的增长。这时候就得面对两个基础的问题: 很难真正地对代码进行封装, 而系统并没有对不同部分(也就是 JAR 文件)之间的依赖关系有个明确的概念。每一个公共类都可以被类路径之下任何其它的公共类所访问到, 这样就会导致无意中使用了并不想被公开访问的 API。此外,类路径本身也存在问题: 你怎么知晓所有需要的 JAR 都已经有了, 或者是不是会有重复的项呢? 模块系统把这俩个问题都给解决了。 模块化的 JAR 文件都包含一个额外的模块描述器。在这个模块描述器中, 对其它模块的依赖是通过 “requires” 来表示的。另外, “exports” 语句控制着哪些包是可以被其它模块访问到的。所有不被导出的包默认都封装在模块的里面。如下是一个模块描述器的示例,存在于 “module-info.java” 文件中:
module blog
{
    exports com.pluralsight.blog;

    requires cms;
}
我们可以如下展示模块:
请注意,两个模块都包含封装的包,因为它们没有被导出(使用橙色盾牌可视化)。 没有人会偶然地使用来自这些包中的类。Java 平台本身也使用自己的模块系统进行了模块化。通过封装 JDK 的内部类,平台更安全,持续改进也更容易。当启动一个模块化应用时, JVM 会验证是否所有的模块都能使用,这基于 requires 语句——比脆弱的类路径迈进了一大步。模块允许你更好地强制结构化封装你的应用并明确依赖。
(四):JShel,交互式 Java REPL
许多语言已经具有交互式编程环境,Java 现在加入了这个俱乐部。您可以从控制台启动 jshell ,并直接启动输入和执行 Java 代码。 jshell 的即时反馈使它成为探索 API 和尝试语言特性的好工具。
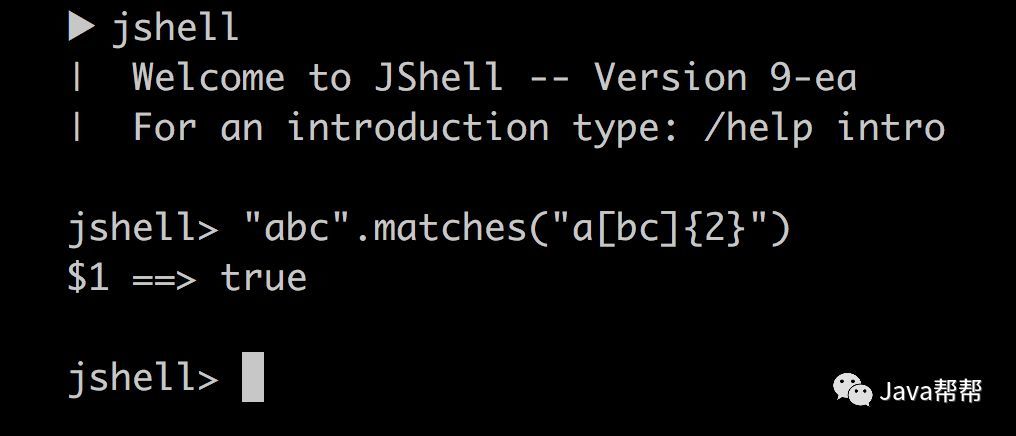
测试一个 Java 正则表达式是一个很好的说明 jshell 如何使您的生活更轻松的例子。 交互式 shell 还可以提供良好的教学环境以及提高生产力,您可以在此了解更多信息。在教人们如何编写 Java 的过程中,不再需要解释 “public static void main(String [] args)” 这句废话。
JShell详解
JShell项目是第一个官方的Java REPL (Read-Eval-Print-Loop的缩写,即交互式编程环境),是一种命令行工具。它允许你无需使用类或者方法包装来执行Java语句。它与Python的解释器类似,或其它本地支持REPL的JVM语言,如Scala和Groovy。在Java 9新特性中,这绝对是更有趣的特性之一。下面让我们看看JShell一些最有趣的特性。
1 分号对于纯语句是可选的
实际上,在发起的一个关于未来Java特性的调查中,该特性是受多数人认可的。当然分号仍被保留了下来,无论是作为终结符还是分隔符。REPL允许一次性键入纯表达式和语句,因此分号对于JShell终端用例是可选的。
2 没有受检异常
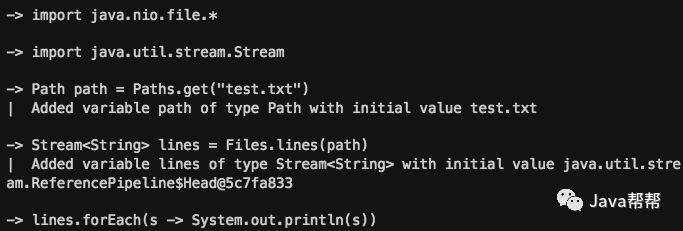
如果你一直担心受检异常会毁掉你的REPL经历——无需再担心,JShell在后台为你隐藏好了。在下面的例子中,本应当强迫我们捕获一个IOException,却没有出现。下面的例子是我们在读取和打印一个文件,不需要处理IOException。
有一种情况的确会有受检异常弹出,就是当我们尝试运行一个线程,并在里面使用了 Thread.sleep() 语句。由于这是一个整体的方法而非单独的纯语句,它必须是完全有效的Java语句:
3 Java表达式
JShell终端还可以自己计算Java表达式。字符串连接、方法回调、算法,诸如此类。基本上,任何你可以包装在 System.out.println(/ expression here /) 里的都可以计算。正如你可能已经知道到的其它计算方式,它会立即将结果赋给自己的一个变量并打印出来。
4 向前引用
JShell给向前引用提供了很棒的支持,所以你在定义方法时可以引用其他方法或变量,且这些方法或变量仅会在一段时间后被定义。这是AdoptOpenJDK提供的REPL指南中的一个例子:
5 REPL网络
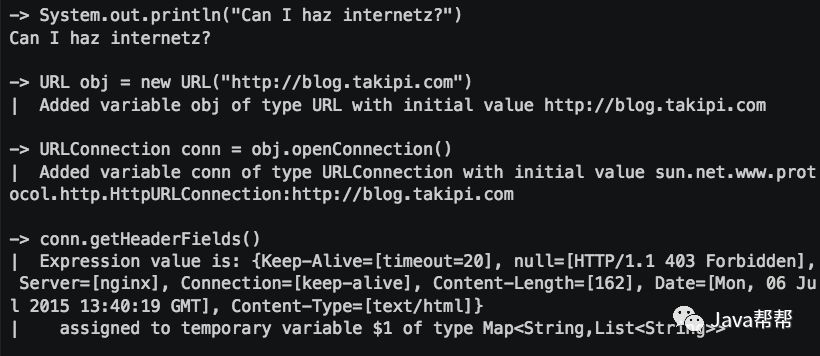
使用JShell时,我们不会受限于机器和网络访问,这带来了一些有趣的机会。例如,想想把它当做一个终端来与服务器交流,远程连接到服务器并且从外面控制一些参数。另一个选择是查询数据库,这里真的是有无限可能。
(五):集合工厂方法
通常,您希望在代码中创建一个集合(例如,List 或 Set ),并直接用一些元素填充它。 实例化集合,几个 “add” 调用,使得代码重复。 Java 9,添加了几种集合工厂方法:
Set<Integer> ints = Set.of(1, 2, 3);
List<String> strings = List.of("first", "second");
除了更短和更好阅读之外,这些方法也可以避免您选择特定的集合实现。 事实上,从工厂方法返回已放入数个元素的集合实现是高度优化的。这是可能的,因为它们是不可变的:在创建后,继续添加元素到这些集合会导致 “UnsupportedOperationException” 。
(六):改进的 Stream API
长期以来,Stream API 都是 Java 标准库最好的改进之一。通过这套 API 可以在集合上建立用于转换的申明管道。在 Java 9 中它会变得更好。Stream 接口中添加了 4 个新的方法:dropWhile, takeWhile, ofNullable。还有个 iterate 方法的新重载方法,可以让你提供一个 Predicate (判断条件)来指定什么时候结束迭代:
IntStream.iterate(1, i -> i < 100, i -> i + 1).forEach(System.out::println);
第二个参数是一个 Lambda,它会在当前 IntStream 中的元素到达 100 的时候返回 true。因此这个简单的示例是向控制台打印 1 到 99。 除了对 Stream 本身的扩展,Optional 和 Stream 之间的结合也得到了改进。现在可以通过 Optional 的新方法 stram将一个 Optional 对象转换为一个(可能是空的) Stream 对象:
Stream<Integer> s = Optional.of(1).stream();
在组合复杂的 Stream 管道时,将 Optional 转换为 Stream 非常有用。
(七):多版本兼容JAR
多版本兼容JAR这个特性对于库的维护者而言是个特别好的消息。当一个新版本的 Java 出现的时候,你的库用户要花费数年时间才会切换到这个新的版本。这就意味着库得去向后兼容你想要支持的最老的 Java 版本 (许多情况下就是 Java 6 或者 7)。这实际上意味着未来的很长一段时间,你都不能在库中运用 Java 9 所提供的新特性。幸运的是,多版本兼容 JAR 功能能让你创建仅在特定版本的 Java 环境中运行库程序时选择使用的 class 版本:
multirelease.jar
    ├──META-INF
    │   └──versions
    │       └── 9
            │           └──multirelease
    │               └──Helper .class
    ├──multirelease
        ├──Helper .class
        └──Main .class
在上述场景中, multirelease.jar 可以在 Java 9 中使用, 不过 Helper 这个类使用的不是顶层的 multirelease.Helper 这个 class, 而是处在“META-INF/versions/9”下面的这个。这是特别为 Java 9 准备的 class 版本,可以运用 Java 9 所提供的特性和库。同时,在早期的 Java 诸版本中使用这个 JAR 也是能运行的,因为较老版本的 Java 只会看到顶层的这个 Helper 类。
(八):私有接口方法
Java 8 为我们带来了接口的默认方法。 接口现在也可以包含行为,而不仅仅是方法签名。 但是,如果在接口上有几个默认方法,代码几乎相同,会发生什么情况? 通常,您将重构这些方法,调用一个可复用的私有方法。 但默认方法不能是私有的。 将复用代码创建为一个默认方法不是一个解决方案,因为该辅助方法会成为公共API的一部分。 使用 Java 9,您可以向接口添加私有辅助方法来解决此问题:
public interface MyInterface {

    void normalInterfaceMethod();

    default void interfaceMethodWithDefault() {
        init();
    }

    default void anotherDefaultMethod() {
        init();
    }

    // This method is not part of the public API exposed by MyInterface
    private void init() {
        System.out.println("Initializing");
    }
}
如果您使用默认方法开发 API ,那么私有接口方法可能有助于构建其实现。
(九):HTTP/2
Java 9 中有新的方式来处理 HTTP 调用。这个迟到的特性用于代替老旧的 HttpURLConnection API,并提供对 WebSocket 和 HTTP/2 的支持。注意:新的 HttpClient API 在 Java 9 中以所谓的孵化器模块交付。也就是说,这套 API 不能保证 100% 完成。不过你可以在 Java 9 中开始使用这套 API:
HttpClient client = HttpClient.newHttpClient();
HttpRequest req = HttpRequest.newBuilder(URI.create("http://www.google.com"))
                .header("User-Agent", "Java")
                .GET()
                .build();
HttpResponse<String> resp = client.send(req, HttpResponse.BodyHandler.asString());
除了这个简单的请求/响应模型之外,HttpClient 还提供了新的 API 来处理 HTTP/2 的特性,比如流和服务端推送。










近期评论