Maven编译指定module

今天在项目里新添加了一个Module, 但是在jenkins编译的时候会将这个Module也编译, 问题是这个Module根本不需要编译而且巨慢。

因此我只想编译指定模块 ModuleA以及它依赖的必须模块, 以下是相关的命令

-am --also-make 同时构建所列模块的依赖模块;
-amd -also-make-dependents 同时构建依赖于所列模块的模块;
-pl --projects <arg> 构建制定的模块,模块间用逗号分隔;
-rf -resume-from <arg> 从指定的模块恢复反应堆。
    <modules>
        <module>ModuleA</module>
        <module>ModuleB</module>
        <module>ModuleC</module>
        <module>ModuleD</module>
        <module>ModuleE</module>
    </modules>

首先查看一下依赖关系

mvn dependency:tree

当不然不是上面这句, 所有的依赖关系太复杂了, 会列出依赖的所有的包

自己打开各个module的pom看一下互相之间的依赖就行

假如只想编译ModuleB及其依赖的模块, 那么在编译的时候

mvn clean install -pl ModuleB -am

假设Module依赖了A和C, 那么在编译的时候就只会编译A B C三个模块~

如果ModuleD依赖了B, 然后在编译的时候使用了-amd的话, 那么ModuleD也会被编译, 这个意思就是编译依赖了所列模块的模块

mvn clean install -pl ModuleB -am -amd

使用上面的命令会同时编译 A B C D ~

-rf 选项用于选择起始位置(发现结合-rf的时候, -am和-amd是需要后置的)

假设ModuleA和ModuleC都依赖ModuleB, 那么如果在ModuleB截断, 整个流程不会变, 如果在ModuleA截断, 那么只会从ModuleA开始执行后面的构建流程。

mvn install -pl ModuleB -am -amd -rf ModuleA

上面的命令是从ModuleA开始截断的

总结

一般来说经常用到的命令, 你想编译的Module: ModuleX

mvn clean install ModuleX -am
mvn clean package install -pl 模块的名称 -am

angular directives scope

以前学过,但是忘记了,所以重新记录一篇文章。

directive中的restrict属性,来决定这个指令是作为标签(E)、属性(A)、属性值(C)、还是注释(M)。

1、false(默认值):直接使用父scope。比较“危险”。

可以理解成指令内部并没有一个新的scope,它和指令以外的代码共享同一个scope。

2、true:继承父scope


3、{ }:创建一个新的“隔离”scope,但仍可与父scope通信

隔离的scope,通常用于创建可复用的指令,也就是它不用管父scope中的model。然而虽然说是“隔离”,但通常我们还是需要让这个子scope跟父scope中的变量进行绑定。绑定的策略有3种:

  • @:单向绑定,外部scope能够影响内部scope,但反过来不成立
  • =:双向绑定,外部scope和内部scope的model能够相互改变
  • &:把内部scope的函数的返回值和外部scope的任何属性绑定起来
(1)@:单向绑定

示例代码:

<body ng-app="watchDemo">
<!--外部scope-->
<p>父scope:<input type="text" ng-model="input"></p>
<!--内部隔离scope-->
<my-directive my-text="{{input}}"></my-directive>

<script>
    var app = angular.module('watchDemo', []);
    app.directive('myDirective', function () {
        return {
            restrict: 'E',
            replace: true,
            template: '<p>自定义指令scope:<input type="text" ng-model="myText"></p>',
            scope: {
                myText: '@'
            }
        }
    });
</script>
</body>

(2)=:双向绑定

示例代码:

<body ng-app="watchDemo">
<!--外部scope-->
<p>父scope:<input type="text" ng-model="input"></p>

<!--内部隔离scope-->
<!--注意这里,因为是双向绑定,所以这里不要“{{}}”这个符号-->
<my-directive my-text="input"></my-directive>

<script>
    var app = angular.module('watchDemo', []);
    app.directive('myDirective', function () {
        return {
            restrict: 'E',
            replace: true,
            template: '<p>自定义指令scope:<input type="text" ng-model="myText"></p>',
            scope: {
                myText: '=' // 这里改成了双向绑定
            }
        }
    });
</script>
</body>
(3)&:内部scope的函数返回值和外部scope绑定


<body ng-app="watchDemo">
<!--外部scope-->
<p>父scope:<input type="text" ng-model="input"></p>

<!--内部隔离scope-->
<!--注意这里,函数名字也要用 连字符命名法-->
<my-directive get-my-text="input"></my-directive>

<script>
    var app = angular.module('watchDemo', []);
    app.directive('myDirective', function () {
        return {
            restrict: 'E',
            replace: true,
            template: '<p>结果:{{ getMyText() }}</p>',
            scope: {
                getMyText: '&' // 这里改成了函数返回值的绑定
            }
        }
    });
</script>
</body>

bootstrap-datetimepicker文档

此地址可以克隆或fork本项目

git clone git://github.com/smalot/bootstrap-datetimepicker.git

希望这个小小的项目能帮到你 !

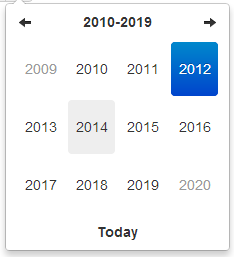
十年视图

1601281761-4178-standard-decade

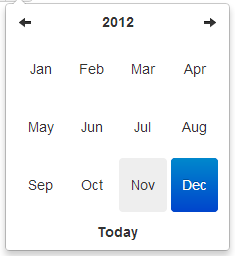
年视图

1601281746-7193-standard-year

月视图

1601281751-4054-standard-month

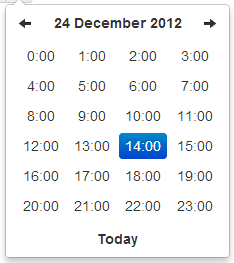
日视图*

1601281746-2137-standard-day

小时视图 *

1601281746-5354-standard-hour

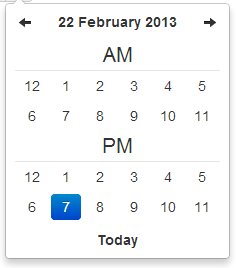
Day view w/ meridian *

1601281751-4898-standard-day-meridian

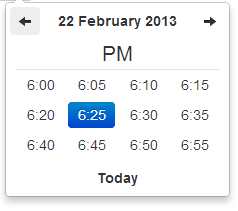
Hour view w/ meridian *

1601281753-5799-standard-hour-meridian

(*) Added views to select the time part.

需要bootstrap的下拉菜单组件 (dropdowns.less) 的某些样式,还有bootstrap的sprites (sprites.less and associated images) 中的箭头图标。

A standalone .css file (including necessary dropdown styles and alternative, text-based arrows) can be generated by running build/build_standalone.less through the lessc compiler:

$ lessc build/build_standalone.less datetimepicker.css

所有需要”Date” 的选项都可以处理Date 对象; a String formatted according to the given format; or a timedelta relative to today, eg ‘-1d’, ‘+6m +1y’, etc, where valid units are ‘d’ (day), ‘w’ (week), ‘m’ (month), and ‘y’ (year).

你也可以指定一个符合 ISO-8601 格式的日期时间,就可以忽略下面的格式:

  • yyyy-mm-dd
  • yyyy-mm-dd hh:ii
  • yyyy-mm-ddThh:ii
  • yyyy-mm-dd hh:ii:ss
  • yyyy-mm-ddThh:ii:ssZ

format

String. 默认值: ‘mm/dd/yyyy’

日期格式, p, P, h, hh, i, ii, s, ss, d, dd, m, mm, M, MM, yy, yyyy 的任意组合。

  • p : meridian in lower case (‘am’ or ‘pm’) – according to locale file
  • P : meridian in upper case (‘AM’ or ‘PM’) – according to locale file
  • s : seconds without leading zeros
  • ss : seconds, 2 digits with leading zeros
  • i : minutes without leading zeros
  • ii : minutes, 2 digits with leading zeros
  • h : hour without leading zeros – 24-hour format
  • hh : hour, 2 digits with leading zeros – 24-hour format
  • H : hour without leading zeros – 12-hour format
  • HH : hour, 2 digits with leading zeros – 12-hour format
  • d : day of the month without leading zeros
  • dd : day of the month, 2 digits with leading zeros
  • m : numeric representation of month without leading zeros
  • mm : numeric representation of the month, 2 digits with leading zeros
  • M : short textual representation of a month, three letters
  • MM : full textual representation of a month, such as January or March
  • yy : two digit representation of a year
  • yyyy : full numeric representation of a year, 4 digits

weekStart

Integer. 默认值:0

一周从哪一天开始。0(星期日)到6(星期六)

startDate

Date. 默认值:开始时间

The earliest date that may be selected; all earlier dates will be disabled.

endDate

Date. 默认值:结束时间

The latest date that may be selected; all later dates will be disabled.

daysOfWeekDisabled

String, Array. 默认值: ”, []

Days of the week that should be disabled. Values are 0 (Sunday) to 6 (Saturday). Multiple values should be comma-separated. Example: disable weekends: '0,6' or [0,6].

autoclose

Boolean. 默认值:false

当选择一个日期之后是否立即关闭此日期时间选择器。

startView

Number, String. 默认值:2, ‘month’

日期时间选择器打开之后首先显示的视图。 可接受的值:

  • 0 or ‘hour’ for the hour view
  • 1 or ‘day’ for the day view
  • 2 or ‘month’ for month view (the default)
  • 3 or ‘year’ for the 12-month overview
  • 4 or ‘decade’ for the 10-year overview. Useful for date-of-birth datetimepickers.

minView

Number, String. 默认值:0, ‘hour’

日期时间选择器所能够提供的最精确的时间选择视图。

maxView

Number, String. 默认值:4, ‘decade’

日期时间选择器最高能展示的选择范围视图。

todayBtn

Boolean, “linked”. 默认值: false

如果此值为true 或 “linked”,则在日期时间选择器组件的底部显示一个 “Today” 按钮用以选择当前日期。如果是true的话,”Today” 按钮仅仅将视图转到当天的日期,如果是”linked”,当天日期将会被选中。

todayHighlight

Boolean. 默认值: false

如果为true, 高亮当前日期。

keyboardNavigation

Boolean. 默认值: true

是否允许通过方向键改变日期。

language

String. 默认值: ‘en’

The two-letter code of the language to use for month and day names. These will also be used as the input’s value (and subsequently sent to the server in the case of form submissions). Currently ships with English (‘en’), German (‘de’), Brazilian (‘br’), and Spanish (‘es’) translations, but others can be added (see I18N below). If an unknown language code is given, English will be used.

forceParse

Boolean. 默认值: true

当选择器关闭的时候,是否强制解析输入框中的值。也就是说,当用户在输入框中输入了不正确的日期,选择器将会尽量解析输入的值,并将解析后的正确值按照给定的格式format设置到输入框中。

minuteStep

Number. 默认值: 5

此数值被当做步进值用于构建小时视图。对于每个 minuteStep 都会生成一组预设时间(分钟)用于选择。

pickerReferer : 不建议使用

String. 默认值: ‘default’ (other value available : ‘input’)

The referer element to place the picker for the component implementation. If you want to place the picker just under the input field, just specify input.

pickerPosition

String. 默认值: ‘bottom-right’ (还支持 : ‘bottom-left’)

此选项当前只在组件实现中提供支持。通过设置选项可以讲选择器放倒输入框下方。

viewSelect

Number or String. 默认值: same as minView (supported values are: ‘decade’, ‘year’, ‘month’, ‘day’, ‘hour’)

With this option you can select the view from which the date will be selected. By default it’s the last one, however you can choose the first one, so at each click the date will be updated.

showMeridian

Boolean. 默认值: false

This option will enable meridian views for day and hour views.

initialDate

Date or String. 默认值: new Date()

You can initialize the viewer with a date. By default it’s now, so you can specify yesterday or today at midnight …

组件模版。

<div class="input-append date" id="datetimepicker" data-date="12-02-2012" data-date-format="dd-mm-yyyy">
    <input class="span2" size="16" type="text" value="12-02-2012">
    <span class="add-on"><i class="icon-th"></i></span>
</div>

带有重置按钮(用于清空输入框)的组件模版。

<div class="input-append date" id="datetimepicker" data-date="12-02-2012" data-date-format="dd-mm-yyyy">
    <input class="span2" size="16" type="text" value="12-02-2012">
    <span class="add-on"><i class="icon-remove"></i></span>
    <span class="add-on"><i class="icon-th"></i></span>
</div>

.datetimepicker(options)

初始化日期时间选择器。

remove

参数: None

移除日期时间选择器。同时移除已经绑定的event、内部绑定的对象和HTML元素。

$('#datetimepicker').datetimepicker('remove');

show

参数: None

显示日期时间选择器。

$('#datetimepicker').datetimepicker('show');

hide

参数: None

隐藏日期时间选择器。

$('#datetimepicker').datetimepicker('hide');

update

参数: None

使用当前输入框中的值更新日期时间选择器。

$('#datetimepicker').datetimepicker('update');

setStartDate

参数:

  • startDate (String)

给日期时间选择器设置一个新的起始日期。

$('#datetimepicker').datetimepicker('setStartDate', '2012-01-01');

Omit startDate (or provide an otherwise falsey value) to unset the limit.

$('#datetimepicker').datetimepicker('setStartDate');
$('#datetimepicker').datetimepicker('setStartDate', null);

setEndDate

参数:

  • endDate (String)

给日期时间选择器设置结束日期。

$('#datetimepicker').datetimepicker('setEndDate', '2012-01-01');

Omit endDate (or provide an otherwise falsey value) to unset the limit.

$('#datetimepicker').datetimepicker('setEndDate');
$('#datetimepicker').datetimepicker('setEndDate', null);

setDaysOfWeekDisabled

参数:

  • daysOfWeekDisabled (String|Array)

Sets the days of week that should be disabled.

$('#datetimepicker').datetimepicker('setDaysOfWeekDisabled', [0,6]);

Omit daysOfWeekDisabled (or provide an otherwise falsey value) to unset the disabled days.

$('#datetimepicker').datetimepicker('setDaysOfWeekDisabled');
$('#datetimepicker').datetimepicker('setDaysOfWeekDisabled', null);

Datetimepicker 类暴露了一组event用以对日期进行操作。

show

当选择器显示时被触发。

hide

当选择器隐藏时被触发。

changeDate

当日期被改变时被触发。

$('#date-end')
.datetimepicker()
.on('changeDate', function(ev){
    if (ev.date.valueOf() < date-start-display.valueOf()){
        ....
    }
});

changeYear

当十年视图上的年视图view被改变时触发。

changeMonth

当年视图上的月视图view被改变时触发。

outOfRange

当用户选择的日期超出startDate 或endDate 时,或者通过setDate 或 setUTCDate方法设置日期超出范围时被触发。

日期时间选择器提供了键盘导航:

up, down, left, right 方向键

这些方向键中,left/right 向后/向前 一天,up/down 向后/向前 一周。

配合shift键,up/left 向后退一个月,down/right 向前进一个月。

配置ctrl键,up/left 向后退一年,down/right 向前进一年。

Shift+ctrl 和 ctrl 同等效果 – 也就是说,他们不能同时改变月和年,只能单独改变年。

escape

escape 键可以用来隐藏、重新显示日期时间选择器;当用户希望手工编辑输入框中的值是会很有用。

enter

当选择器处于显示状态时,enter键只是将其隐藏。当选择器处于隐藏状态时,enter键发挥通常的功能 – 提交当前表单,或者其他。

本插件支持月、每周中天的名称、weekStart选项的国际化。默认是语言是English (‘en’);其它可以使用的翻译文件在js/locales/ 目录中,只需在本插件之后引入需要的语言文件即可。需要增加额外语言支持的话,只需向 $.fn.datetimepicker.dates中增加一个key即可,一定要放在调用 .datetimepicker()之前。如下案例:

$.fn.datetimepicker.dates['en'] = {
    days: ["Sunday", "Monday", "Tuesday", "Wednesday", "Thursday", "Friday", "Saturday", "Sunday"],
    daysShort: ["Sun", "Mon", "Tue", "Wed", "Thu", "Fri", "Sat", "Sun"],
    daysMin: ["Su", "Mo", "Tu", "We", "Th", "Fr", "Sa", "Su"],
    months: ["January", "February", "March", "April", "May", "June", "July", "August", "September", "October", "November", "December"],
    monthsShort: ["Jan", "Feb", "Mar", "Apr", "May", "Jun", "Jul", "Aug", "Sep", "Oct", "Nov", "Dec"],
    today: "Today"
};

Right-to-left languages may also include rtl: true to make the calendar display appropriately.

If your browser (or those of your users) is displaying characters wrong, chances are the browser is loading the javascript file with a non-unicode encoding. Simply add charset="UTF-8" to your script tag:

<script type="text/javascript" src="bootstrap-datetimepicker.de.js" charset="UTF-8"></script>

绑定输入框,并设置format选项:

<input type="text" value="2012-05-15 21:05" id="datetimepicker">
$('#datetimepicker').datetimepicker({
    format: 'yyyy-mm-dd hh:ii'
});

绑定输入框,并设置format标记:

<input type="text" value="2012-05-15 21:05" id="datetimepicker" data-date-format="yyyy-mm-dd hh:ii">
$('#datetimepicker').datetimepicker();

作为组件使用:

<div class="input-append date" id="datetimepicker" data-date="12-02-2012" data-date-format="dd-mm-yyyy">
    <input size="16" type="text" value="12-02-2012" readonly>
    <span class="add-on"><i class="icon-th"></i></span>
</div>
$('#datetimepicker').datetimepicker();

作为内联日期时间选择器:

<div id="datetimepicker"></div>
$('#datetimepicker').datetimepicker();

#!/usr/bin/env bash和#!/usr/bin/bash的比较

通过/usr/bin/env 运行程序,用户不需要去寻找程序在系统中的位置(因为在不同的系统,命令或程序存放的位置可能不同),只要程序在你的$PATH中;

通过/usr/bin/env 运行程序另一个好处是,它会根据你的环境寻找并运行默认的版本,提供灵活性。

不好的地方是,有可能在一个多用户的系统中,别人在你的$PATH中放置了一个bash,可能出现错误。


大部分情况下,/usr/bin/env是优先选择的,因为它提供了灵活性,特别是你想在不同的版本下运行这个脚本;而指定具体位置的方式#! /usr/bin/bash,在某些情况下更安全,因为它限制了代码注入的可能。

Spring Boot Logging 配置(记录)

我用到的配置,贴个记录

logging:
  level:
    root: info
  file:
    path: ./log/${server.port}
  pattern:
    file: '%d{yyyy/MM/dd HH:mm:ss.SSS} %clr(%-5level) [%magenta(%thread)] %cyan(%logger{15}) : %msg%n'
    console: '%d{yyyy/MM/dd HH:mm:ss.SSS} %clr(%-5level) [%magenta(%thread)] %cyan(%logger{15}) : %msg%n'

百分号格式化解释:

  •  %d:日期,大括号里面为日期的显示格式;
  • %clr(): 根据内容显示不同颜色的的方法,一般是给“日志级别”这个信息使用的;
  • %level:日志级别,百分号和关键字中间的短杠和数字(-5)表示显示这么多个字符的宽度,内容不足则补充空格占位;
  • %magenta():将内容显示为品红色字体。显示为其他颜色可以参考这个图,注意看图中绿色字体;
  • (%thread):线程名;
  • %cyan:将内容显示为青色字体;
  • %logger:事件发生的位置的所在类的全类名;
  • %line:事件发生的位置的行号;
  • %msg:事件信息;
  • %n:换行,输出跨操作系统的换行符号;

配置参数:

  • logging.level.* : 作为package(包)的前缀来设置日志级别。
  • logging.file :配置日志输出的文件名,也可以配置文件名的绝对路径。
  • logging.path :配置日志的路径。如果没有配置logging.file,Spring Boot 将默认使用spring.log作为文件名。
  • logging.pattern.console :定义console中logging的样式。
  • logging.pattern.file :定义文件中日志的样式。
  • logging.pattern.level :定义渲染不同级别日志的格式。默认是%5p.
  • logging.exception-conversion-word :.定义当日志发生异常时的转换字
  • PID :定义当前进程的ID

logging.level

logging.level设置日志级别。我们可以使用TARCE , DEBUG , INFO , WARN , ERROR , FATAL , OFF 。可以使用root级别和package级别来控制日志的输入级别。创建一个具有以下依赖关系的应用程序。

logging.file

Spring Boot 默认把日志输入到console,如果我们要把日志输入到文件中,需要配置logging.file 或者logging.path属性性。logging.file属性用来定义文件名。他不仅仅可以配置文件名,也可以路径+文件名。

logging.path

配置logging.path或者logging.path属性将日志输出到文件夹中。logging.path属性用来定义日志文件路径。

logging.patter.console

通过设置logging.patter.console属性我们能改变输出到console的日志样式。日志样式包括时间,日志级别,线程名,日志名以及消息。我们可以按我们的喜好改变日志样式

logging.pattern.file

改变文件中的日志样式我们需要设置logging.pattern.file属性。首先通过logging.file或logging.path属性,把日志记录到文件中。


1910111213114
 
Copyright © 2008-2021 lanxinbase.com Rights Reserved. | 粤ICP备14086738号-3 |