angularjs的自定义directive指令的绑定策略scope:”@”、”=”、”&”

通常我们知道指令默认是可以跟外界通信的.比如:

<div ng-controller="mytest">
    <test></test>
</div>

test自定义指令是可以访问到mytest控制器的scope
要想把test自定义指令独立作用域,也就是说跟mytest切断关系:可以加上指令的参数scope:{},这样就能做到互不相干了
但是也不可能完成切断关系,总会有某些东西要互相交互,如果想跟mytest控制器的某个scope属性交互,就要用绑定策略

下面来介绍三种绑定策略的做法

1.@符号
“@”是通过DOM的属性来跟mytest控制器交互绑定一起

<div ng-controller="mytest">
    <test></test>
</div>


app.controller("mytest", function ($scope) {
    $scope.name = "jack";
    $scope.age = 25;
});
app.directive("test",function(){
    return {
        restrict : "E",
        template : '<div name="{{name}}"></div>',
        replace : true,
        scope : {
            name : "@"
        },
        controller : function($scope){
            console.log($scope.name);  //"jack"
            console.log($scope.age);   //age是undefined,因为没有跟mytest进行交互
        },
        link : function ($scope) {
            console.log($scope.name); //"jack"
            console.log($scope.age);  //age是undefined,因为没有跟mytest进行交互
        }
    }
});

重点:
scope : {
name : “@”
}
scope对象声明了一个属性name,然后在DOM元素的属性加上一个name,(注意两边的名字必须要一致)这样就可以进行交互操作
点击查看完整代码

2.=符号
“=”有双重绑定的功能,比如mytest控制器与test子指令进行双重绑定(单个字符串、对象都是有效的)下面代码用对象来演示

<div ng-controller="mytest">
    父:<input type="text" ng-model="data.name" />
    <test></test>
</div>


app.controller("mytest", function ($scope) {
    $scope.data = {
        name : "jack",
        age : 25
    }
});
app.directive("test",function(){
    return {
        restrict : "E",
        template : '<div data="data">子指令:<input ng-model="data.name" /></div>',
        replace : true,
        scope : {
            data : "="
        },
        controller : function($scope){
            console.log($scope.data);  //Object {name: "jack", age: 25}
        },
        link : function ($scope) {
            console.log($scope.data); //Object {name: "jack", age: 25}
        }
    }
});

3.&符号
“&”的意思是子指令能调用父控制器的方法,这里的指令template元素点击调用控制器的getName方法

<div ng-controller="mytest">
    <test></test>
</div>


app.controller("mytest", function ($scope) {
    $scope.getName = function(){
        console.log("jack");
    }
});
app.directive("test",function(){
    return {
        restrict : "E",
        template : '<div get-name="getName()">子指令:<a href="javascript:void(0)" ng-click="getName()">点击调用父方法</a></div>',
        replace : true,
        scope : {
            getName : "&"
        },
        controller : function($scope){
            $scope.getName();  //"jack"
        },
        link : function ($scope) {
            $scope.getName(); //"jack"
        }
    }
});

8种JavaScript思维导图

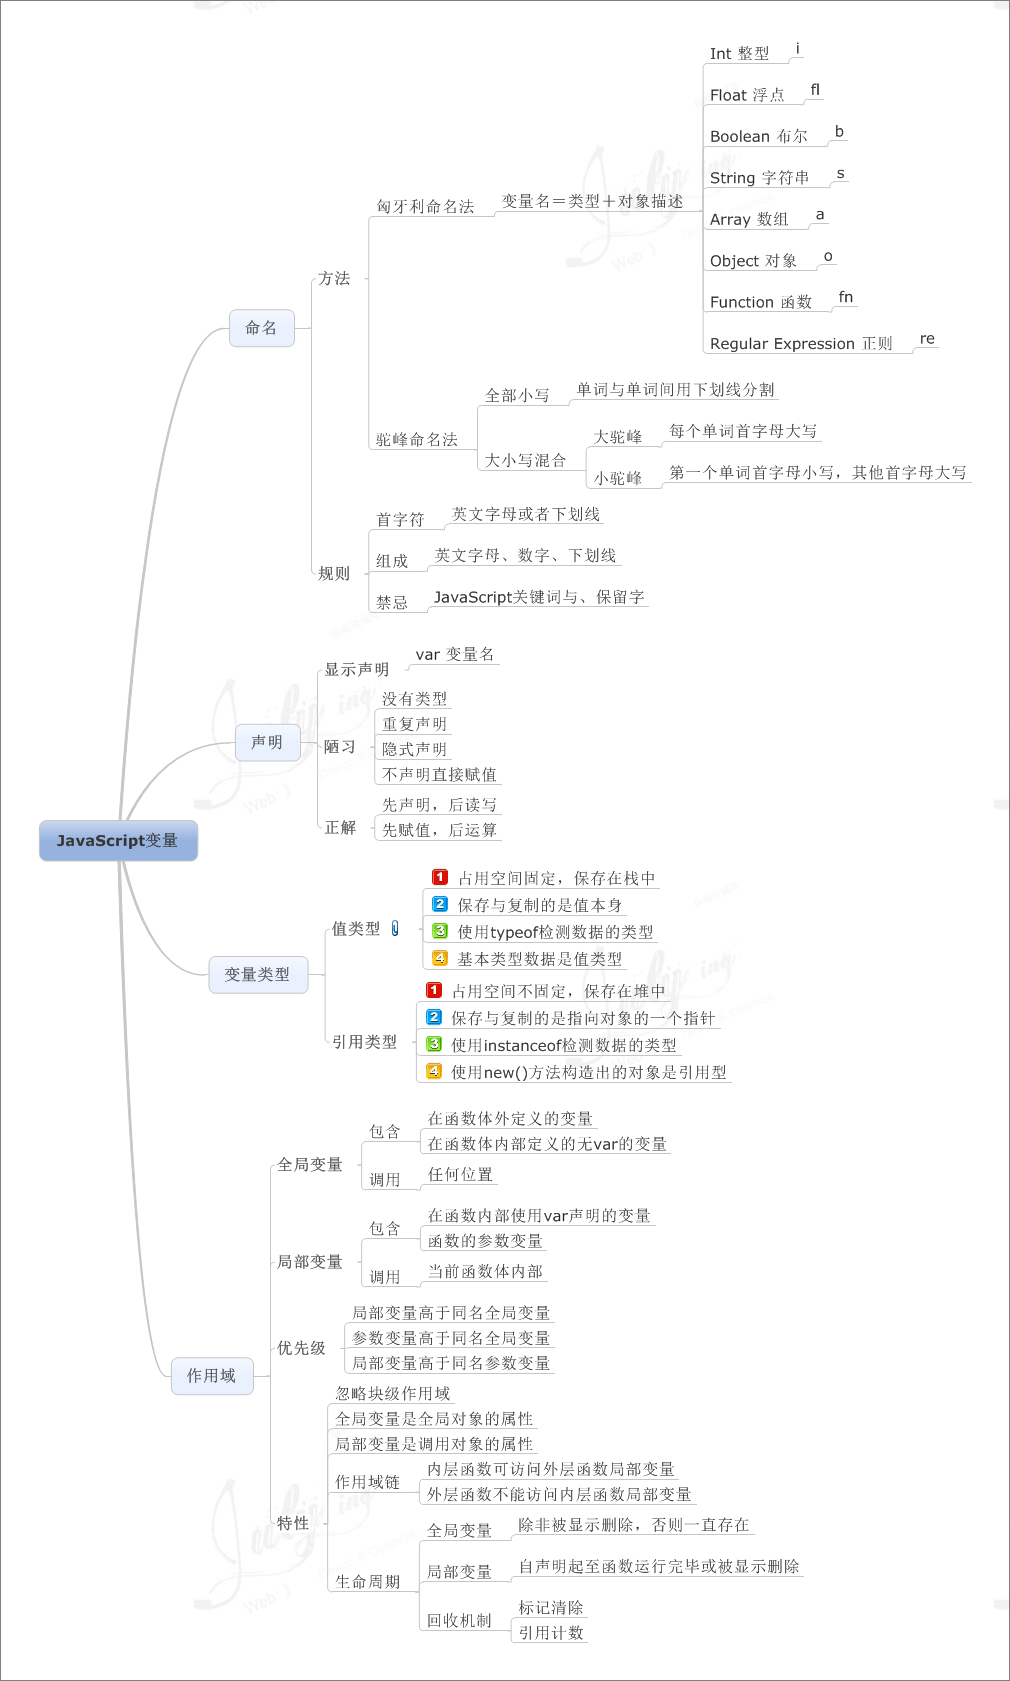
一、JavaScript思维导图之<变量>的学习

1489070795-9656-iom1i-lObTO-fuAAHnyukxd68504

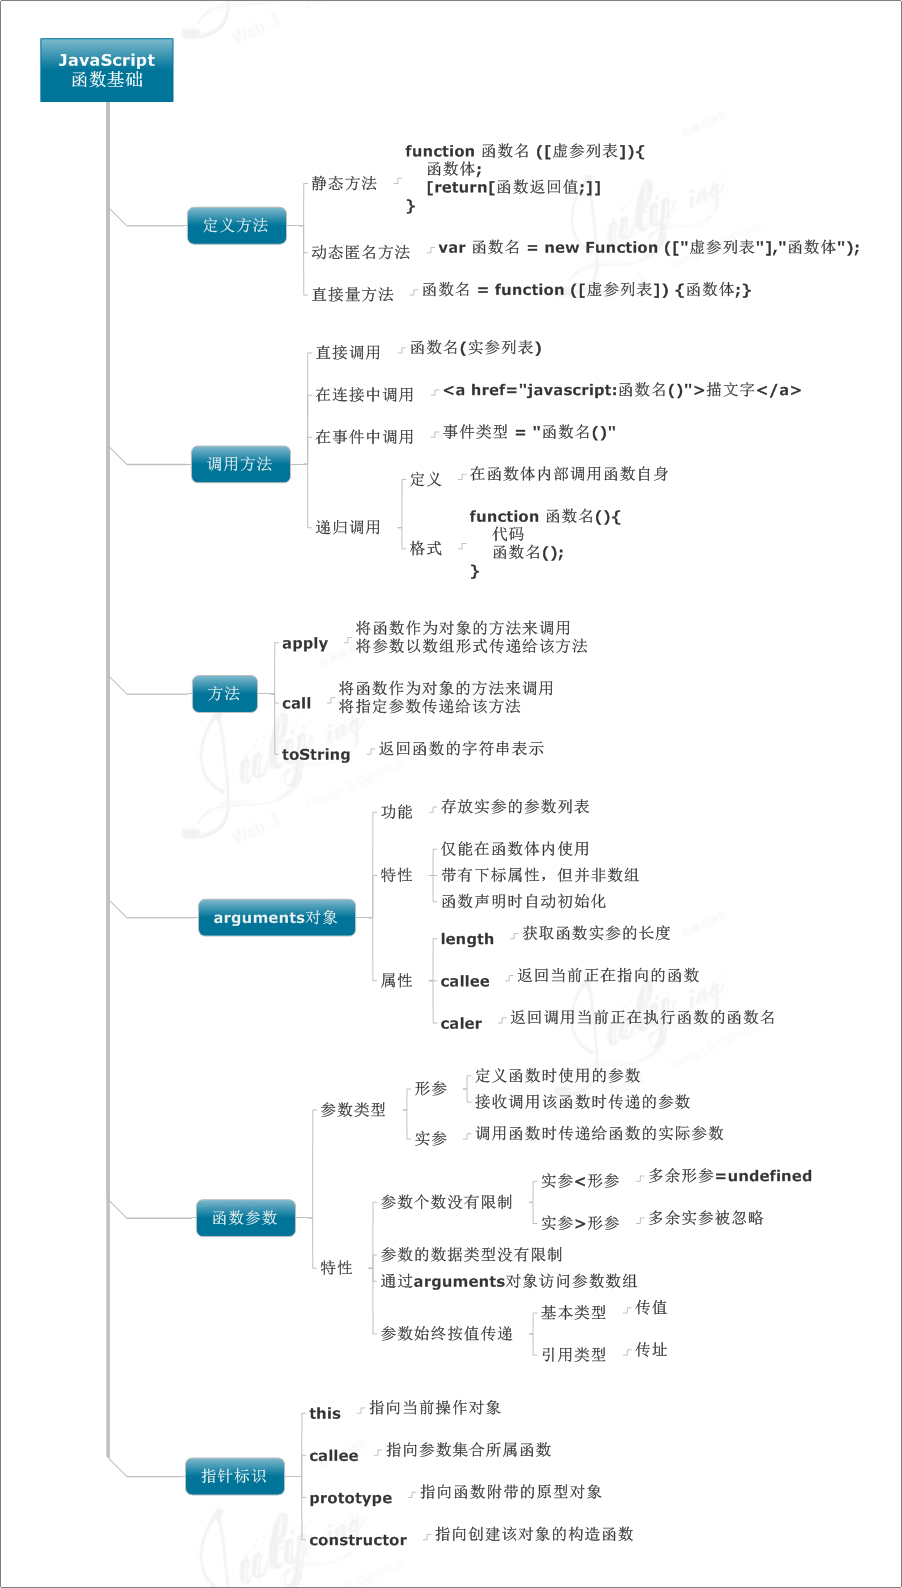
二、    JavaScript思维导图之<函数基础>
1489070801-1544-iom1i-ldrzs8OUAAHstqsTcNk032

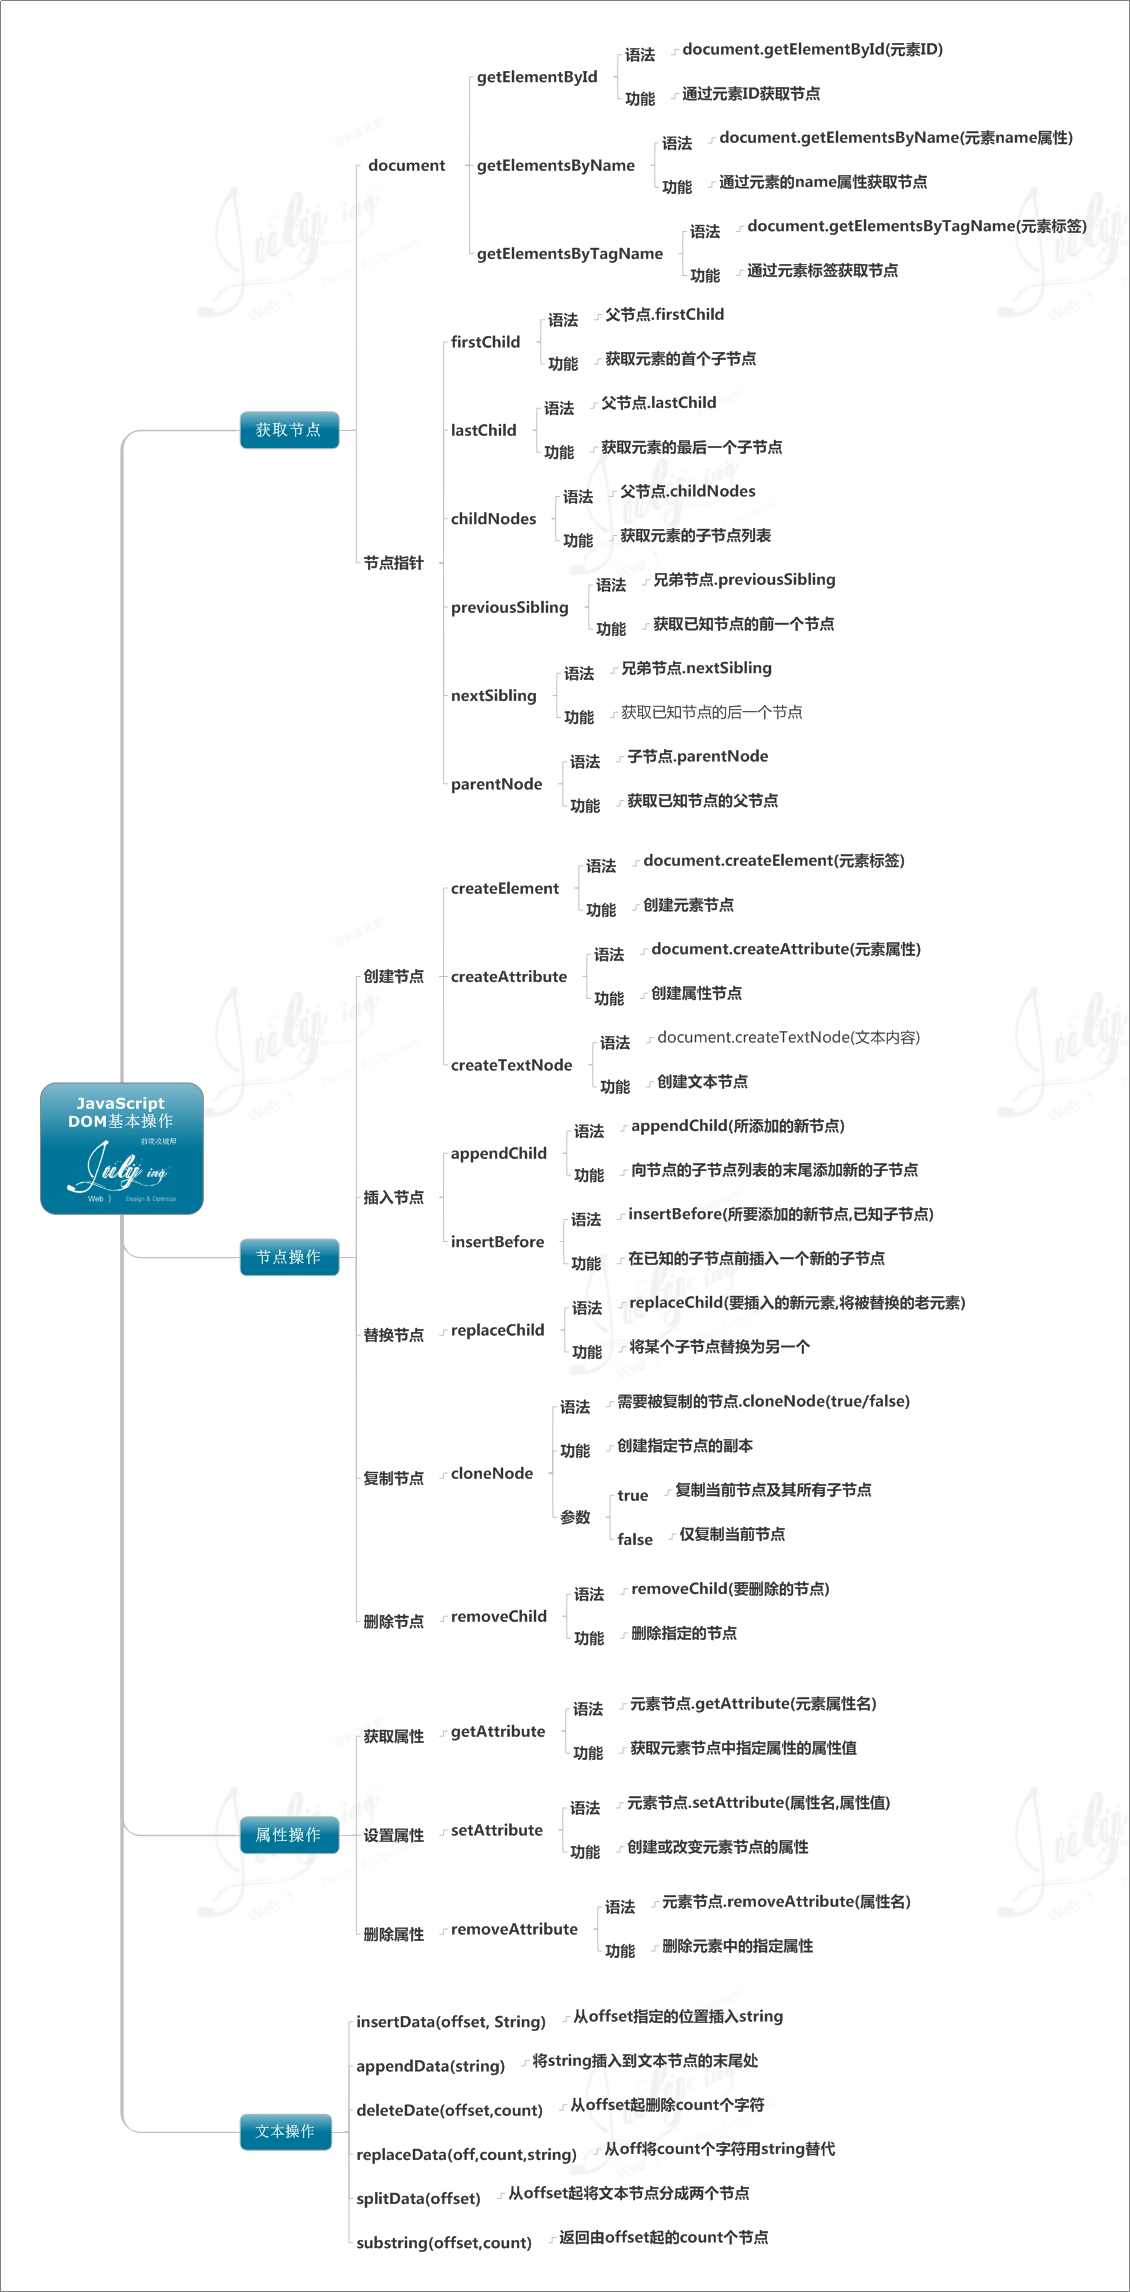
三、JavaScript思维导图之<基本dom操作>

1489070801-4695-iom1i-lnHjavFSAAMn6lGXylQ249

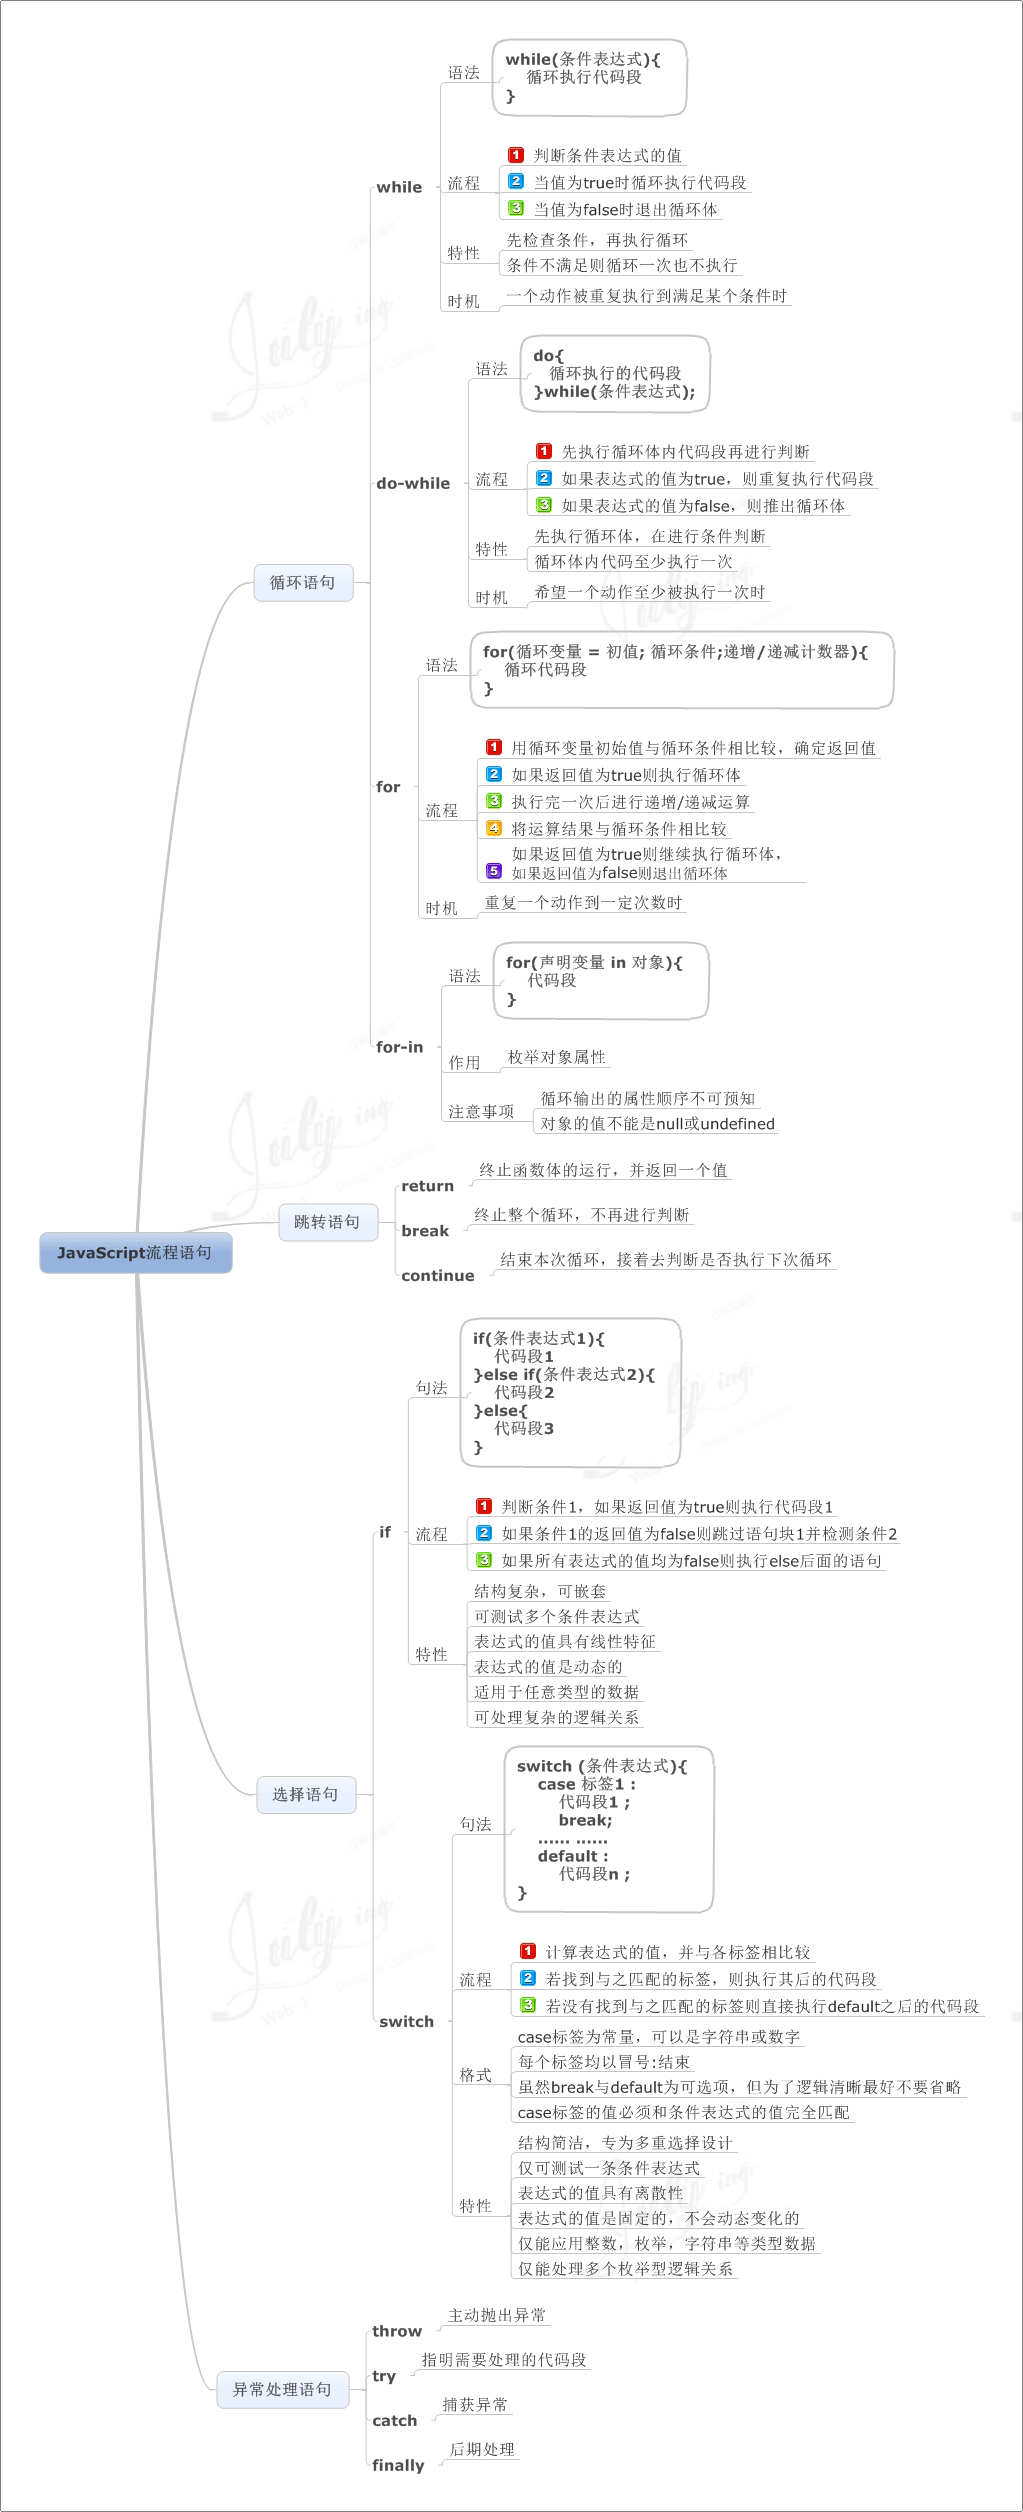
四、JavaScript思维导图之<流程语句>

1489070801-8094-ioL1i-lvLj4-aTAAMKdP9yCsY163

五、JavaScript思维导图之<数组>

1489070790-4496-ioL1i-l8DRZUXgAAPWo3NI-Qs124

六、    JavaScript思维导图之<运算符>

1489070802-5922-iom1i-l9PhBYSbAAaDvXV6gn8492

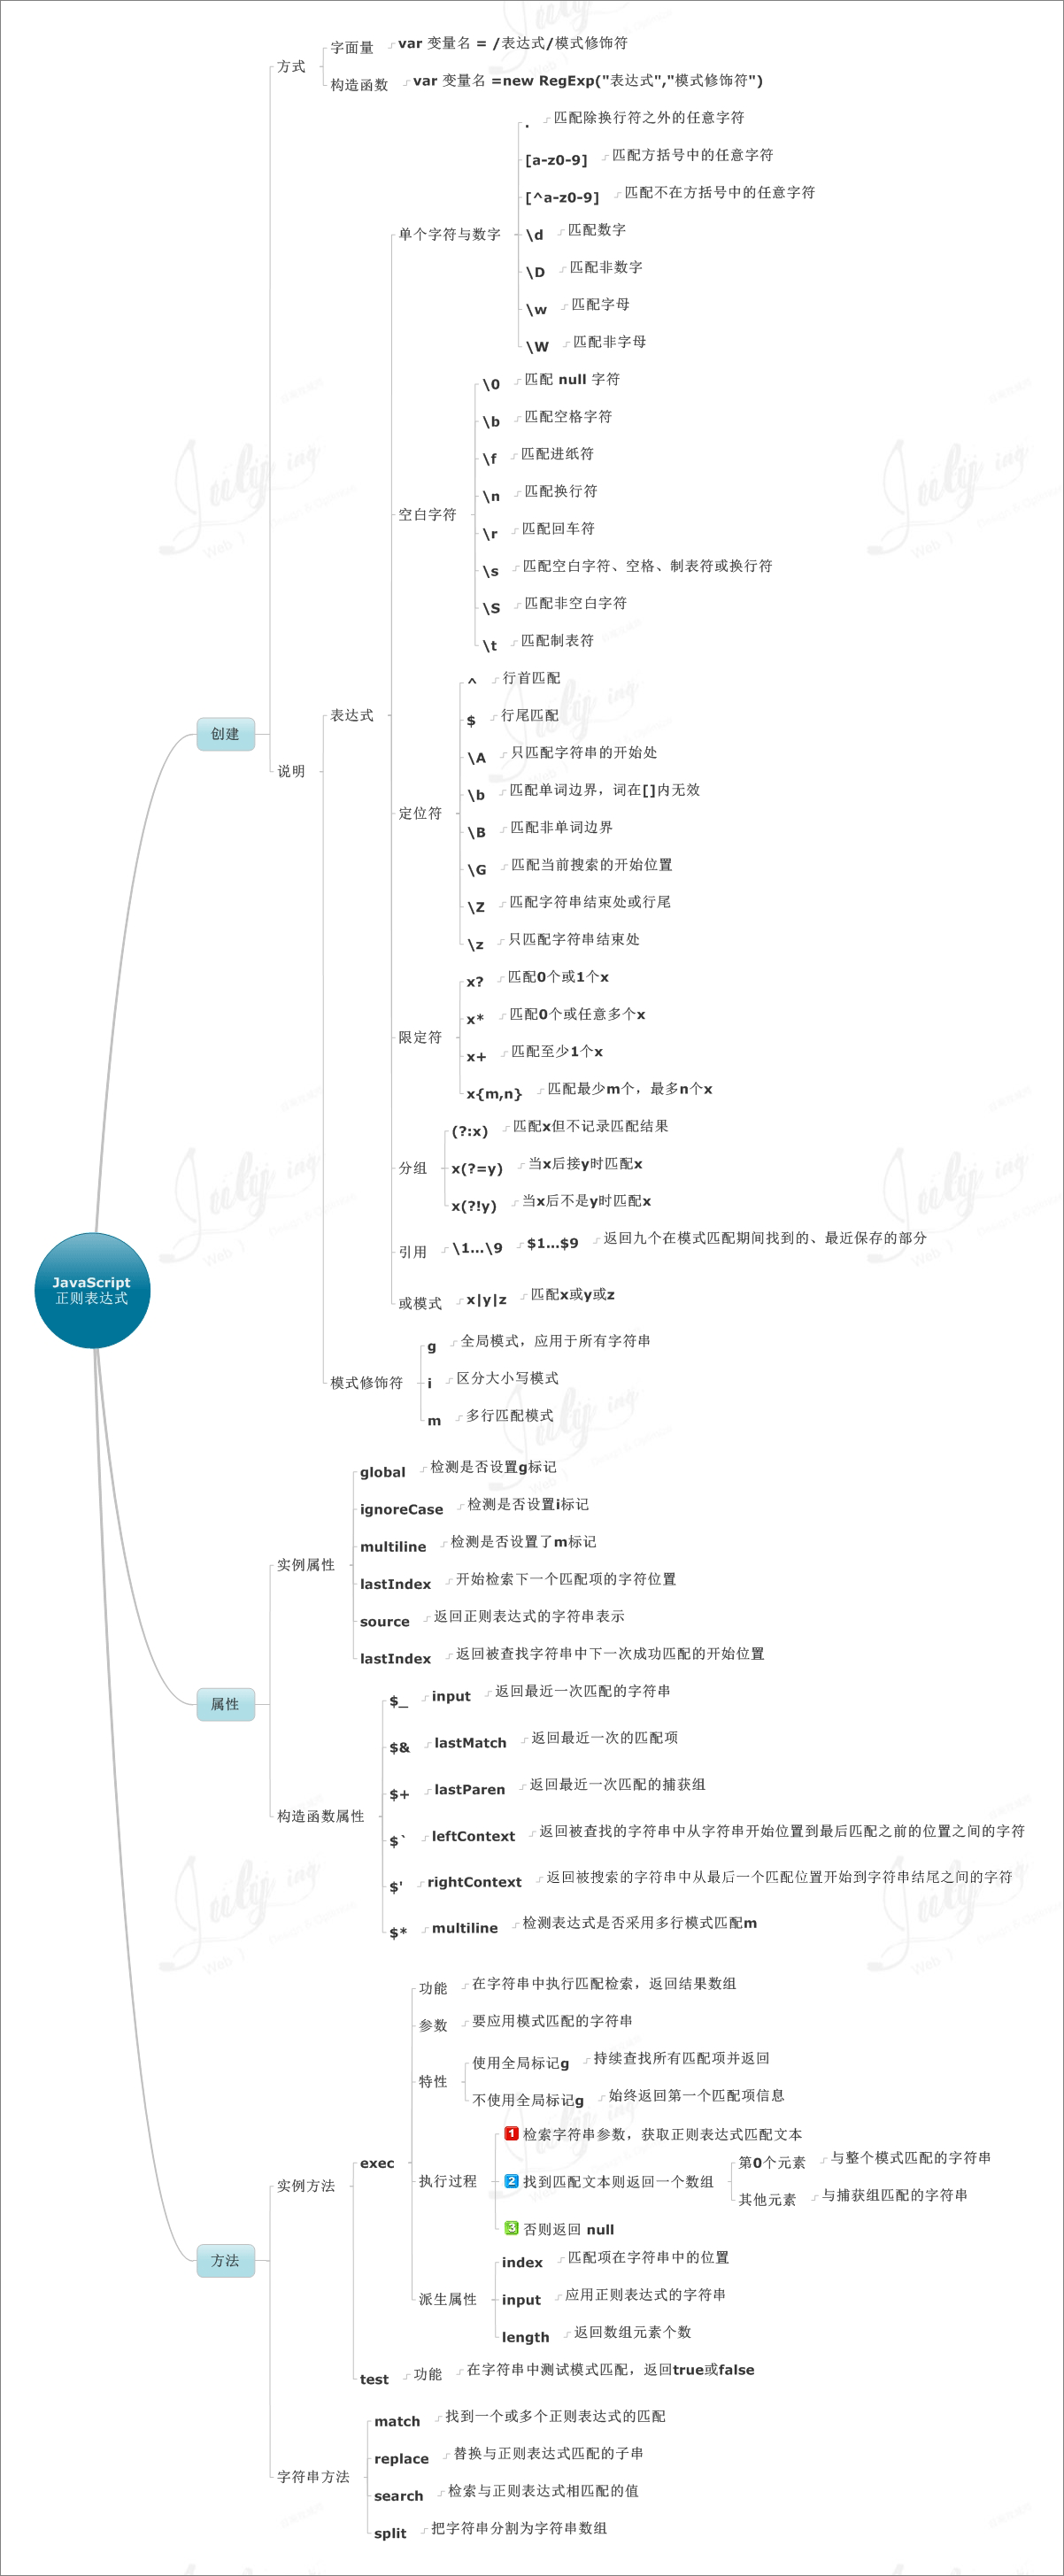
七、JavaScript思维导图之<正则表达式>

1489070801-3756-ioL1i-l-3j86f9AAOl8EVC5pk459

八、JavaScript思维导图之<字符串函数>

1489070802-6387-iom1i-mAOj-rjrAAWrNNAmaW4766

关于 CSS absolute与relative定位

css中的定位类型一览

position这个css属性允许我们指定元素的定位类型。

css定位选项

static是此属性的默认值。这时候,我们称那个元素没有被定位。为了定位它,我们需要改变预定义的类型。

为了改变预定义类型,我们将position的属性值设置为下面中的一个:

·relative

·absolute

·fixed

·sticky

只有设置了之后,我们才能使用offset参数来为我们的元素指定我们想要的位置:

·top

·right

·bottom

·left

·这些属性的初始值是关键字auto

angularJS移动应用触摸touch事件

首先我们定义一个指定(directive),如下面代码:

.directive('myTouchEven', ['$swipe', "$rootScope", function ($swipe, $rootScope) {
    return {
        restrict: 'EA',
        link: function (scope, ele, attrs, ctrl) {
            var startX, pointY;
            $swipe.bind(ele, {
                'start': function (coords) {
                    startX = coords.x;
                    pointY = coords.y;
                    c("startX:" + startX + "pointY:" + pointY)
                },
                'move': function (coords) {
                    var a = coords.x - startX;
                    if (a < -100 && a > -110) {
                        startX = coords.x;
                        $rootScope.$broadcast("TouchEven", "back");
                    } else if (a > 100 && a < 110) {
                        startX = coords.x;
                        $rootScope.$broadcast("TouchEven", "next");
                    }
                    c("move:" + a + " coords.x:" + coords.x)

                },
                'end': function (coords) {
                    c("end")
                    c("endX:" + coords.x + "endY:" + coords.y)
                },
                'cancel': function (coords) {
                    c("cancel")
                }
            });
        }
    }
}])

这里使用$swipe来帮顶触摸事件,在start事件中记录开始点击的坐标值(x、y)的数据;然后我们监控move事件,计算当前的坐标值(x、y)于开始点击的坐标值相差是多少,如果大于或者小于我们设定的数值,那么则发送一个全局广播,这里注入了$rootScope,用来发送全局广播($broadcast),其他指令(directive)、服务(service)、控制器(controller)等只要注册了(TouchEven)广播监听,就能接收到我们发送的广播事件,下面是示例代码:

.controller("ListController", function ($scope, $routeParams,ajax) {
    $scope.pages = 1;

    $scope.$on("TouchEven",function(a,b){
        var is_send = null;
        if(is_send == null){
            is_send = 1;

            if(b == "back"){
                $scope.pages -= 1;
            }else if(b == "next"){
                $scope.pages += 1;
            }

            ajax.get("/api/v1/articleList",{pages:$scope.pages})
                .success(function(data){
                    is_send = null;
                    c(data)
                    /**
                     * write something code.
                     */

                })
                .error(function(err){
                    is_send = null;
                    toast(err.response_err)
                    /**
                     * write something code.
                     */
                })


        }


    });
    
})


angularJS使用directive指令、filter来做表单过滤器

directive做过滤器要人性化很多,但是如果是简单的过滤也可以使用filter来做,设置一个全局变量保存数据验证结果,等到提交表单的时候验证全局变量就可以了:

.directive("myFilter",function(){
    var css = {
        _valid:function(ele){
            ele.removeClass("ng-invalid");
            ele.next().removeClass("hide");
            ele.next().removeClass("input_remove");
            ele.next().removeClass("glyphicon-remove");

            ele.addClass("ng-valid");
            ele.next().addClass("input_ok");
            ele.next().addClass("glyphicon-ok");
        },
        _invalid:function(ele){
            ele.removeClass("ng-valid");
            ele.next().removeClass("input_ok");
            ele.next().removeClass("glyphicon-ok");

            ele.addClass("ng-invalid");
            ele.next().addClass("input_remove");
            ele.next().addClass("glyphicon-remove");
        }
    };
    return {
        require:'ngModel',
        link:function(scope,ele,arrts){
            scope.$watch(arrts.ngModel,function(newVal,oldVal){
                if(typeof newVal != "undefined"){
                    css._valid(ele);
                    if(typeof arrts.type != "undefined"){
                        switch (arrts.type){
                            case 'text':
                                if(typeof newVal != "string"){
                                    css._invalid(ele);
                                }

                                if(typeof arrts.min != "undefined"){
                                    if(newVal.length < arrts.min){
                                        css._invalid(ele);
                                    }
                                }

                                if(typeof arrts.max != "undefined"){
                                    if(newVal.length > arrts.max){
                                        css._invalid(ele);
                                    }
                                }
                                break;
                            case 'number2':
                                var filter  = /^[0-9]+.?[0-9]*$/;
                                if(!filter.test(newVal)){
                                    css._invalid(ele);
                                }

                                if(typeof arrts.min != "undefined"){
                                    if(newVal < parseInt(arrts.min)){

                                        css._invalid(ele);
                                    }
                                }

                                if(typeof arrts.max != "undefined"){
                                    if(newVal > parseInt(arrts.max)){
                                        css._invalid(ele);
                                    }
                                }
                                break;
                            case 'email2':
                                var filter  = /^([a-zA-Z0-9_\.\-])+\@(([a-zA-Z0-9\-])+\.)+([a-zA-Z0-9]{2,4})+$/;
                                if(!filter.test(newVal)){
                                    css._invalid(ele);
                                }
                                break;
                        }
                    }
                }


            });
        }

    };
})
.filter('email2',function(){
    //感觉这个不人性化,也可能是我不会用吧
    return function(input,length){
        if(typeof input == "undefined" || length < input.length){
            //c("输入不合规");
        }
        return input;
    }
})


下面是style的代码:

input.ng-invalid {
    border: 1px solid red;
}
input.ng-valid {
    border: 1px solid green;
}
.input_ok{
    position: absolute;
    z-index: 100;
    right: 1%;
    top: 8px;
    color: #299429;
}
.input_remove{
    position: absolute;
    z-index: 100;
    right: 1%;
    top: 8px;
    color: #ff0000;
}
.form-contant p{
    position: relative;
}

下面是表单html的代码:

<div class="form-contant">
    <h1>Register</h1>
    <p>
        <input type="text" ng-model="user_name" placeholder="请输入用户名" class="form-control" my-filter data="{{user_name|email2:4}}" min="4" max="20">
        <i class="glyphicon glyphicon-ok hide"></i>
    </p>
    <p>
        <input type="text" ng-model="user_pwd" placeholder="请输入密码" class="form-control" my-filter min="4" max="20">
        <i class="glyphicon glyphicon-ok hide"></i>
    </p>
    <p>
        <input type="number2" ng-model="age" placeholder="请输入年龄" class="form-control" my-filter min="4" max="102">
        <i class="glyphicon glyphicon-ok hide"></i>
    </p>
    <p>
        <input type="email2" ng-model="email" placeholder="请输入邮箱" class="form-control" value="" my-filter  min="6" max="50">
        <i class="glyphicon glyphicon-ok hide"></i>
    </p>


    <br>
    <button type="button" class="form-control" ng-click="get()">get</button>
    <button type="button" class="form-control" ng-click="save()">save</button>
    <button type="button" class="form-control" ng-click="put()">put</button>
</div>


1456789
 
Copyright © 2008-2021 lanxinbase.com Rights Reserved. | 粤ICP备14086738号-3 |